
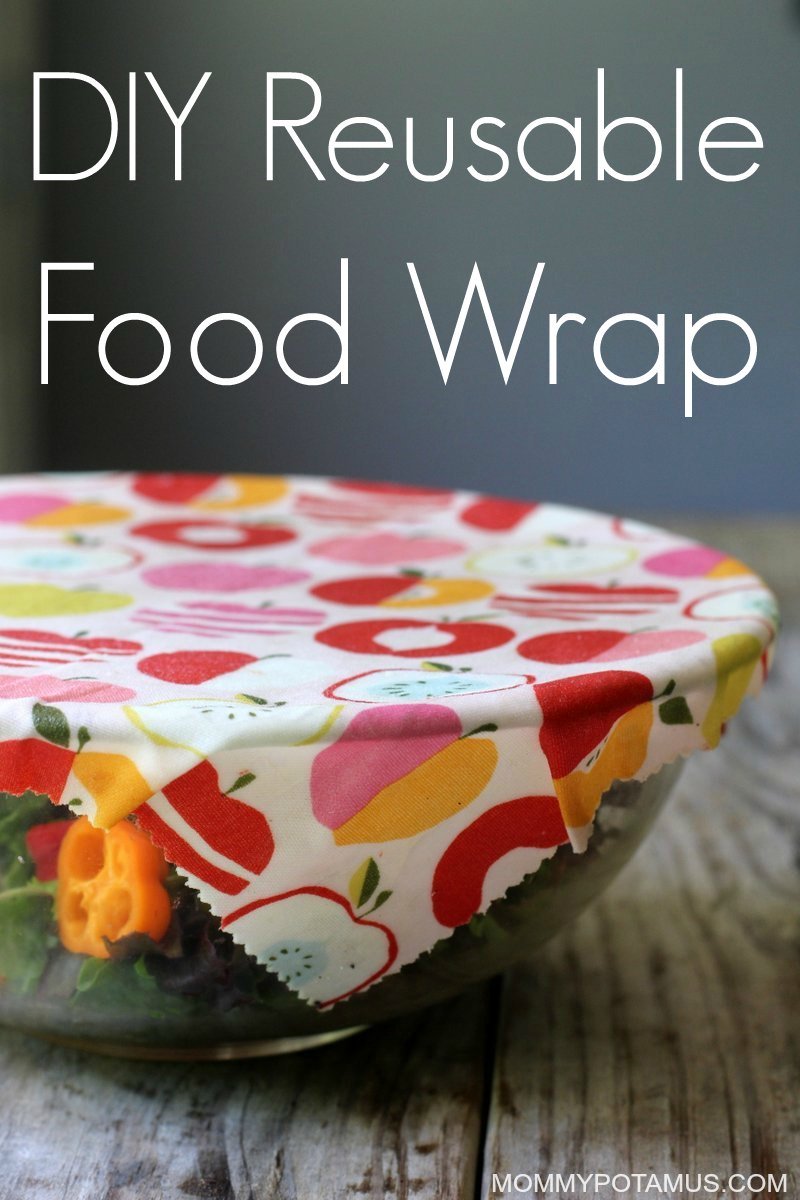
If you’re like me, there’s probably no love lost between you and plastic. Most food-related plastics – including cling wrap and so-called “BPA-free” containers – can “release chemicals that act like the sex hormone estrogen,” according to a study published in Environmental Health Perspectives. (1) (2) Fortunately, there are so many amazing alternatives available now. In this post I’ll share my simple method for how to make beeswax wraps, aka reusable food wrap.
What is reusable food wrap?
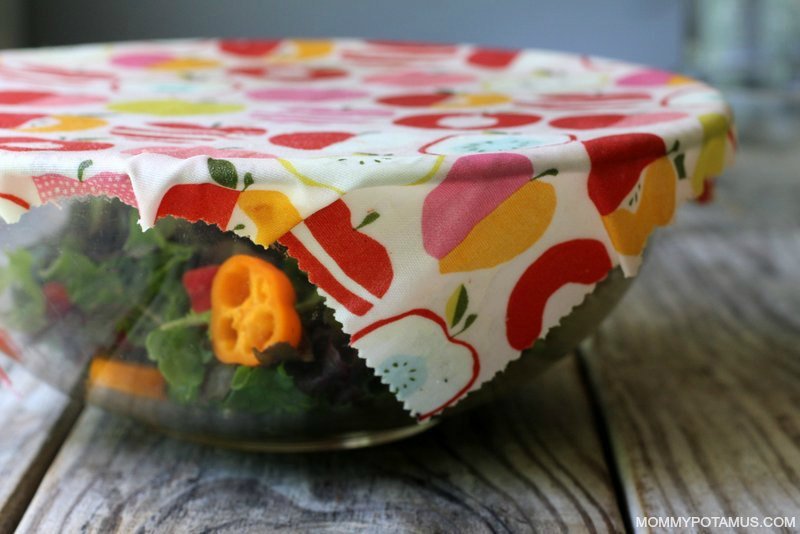
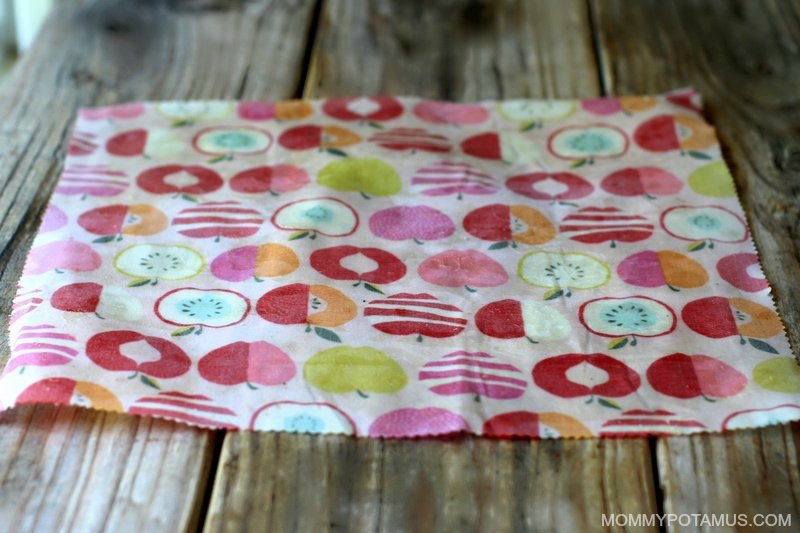
As I wrote in this review, beeswax food wraps are an eco-friendly, reusable alternative to plastic wrap that hugs bowls with just the right amount of cling. They’re saturated in a blend of beeswax, jojoba oil, and pine resin. The beeswax makes the wraps airtight and helps lock in moisture, while the jojoba oil adds flexibility and the pine resin adds cling.
Basically, the warmth of your hands makes them pliable so that you can use them:
- For wrapping snacks, fruit, veggies, cheese, bread and more
- In place of cling wrap over a bowl or other container
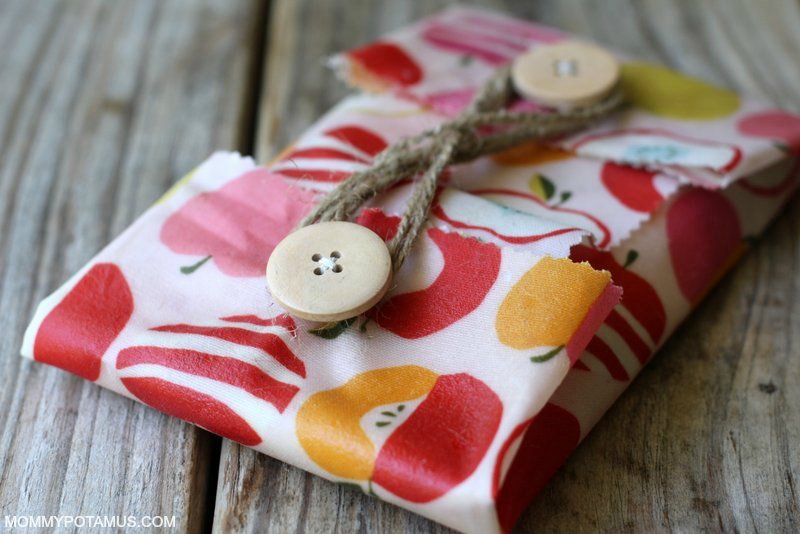
- As reusable snack bags/sandwich bags (You’ll find a tutorial for making them at the bottom of this article, or you can buy beeswax sandwich wraps here)
(Psst! If you’re grain-free and thinking sandwiches are a thing of the past, check out this real deal sandwich bread recipe.)
Why Beeswax Wrap is the BEES KNEES
- It’s made with non-toxic, compostable materials, making it good for us AND the planet
- Beeswax wraps can last a really long time, especially if you refresh them using the mixture below when they lose some of their cling.
So, why make a DIY version?
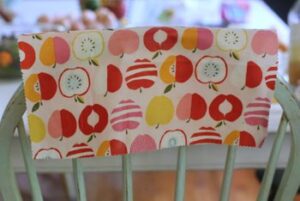
Bees Wrap is a great investment because it’s long lasting, but it is an investment. This DIY version is much more affordable, especially if you buy in bulk and have a make-and-take party with friends. You can also choose beautiful prints – the reusable wrap pictured is a lightweight organic cotton fabric from Monaluna that I got a great deal on. They have a lot of beautiful fabrics to choose from.
Oh, and if you can sew a button – which is just about the extent of my sewing skills – you can make reusable food wrap into these adorable snack bags. As I mentioned above, you’ll find a tutorial for them at the bottom of this page.
Is reusable food wrap difficult to care for?
Nope. Just wash them with cool water and mild dish soap, then allow to air dry.
Now, a few notes:
- They can be washed with cold water and a mild soap ( I use castile soap)
- Since they cannot be washed with hot water they are not recommended for meat
- Items like cheese, vegetables, fruits, nuts, sandwiches, etc. can be wrapped up. Items that contain a lot of moisture (like jello) should not be placed in snack bags
- Depending on how frequently they’re used, they can last for up to a year. After that all you need to so is re-wax them in order to keep using them.
Tip: If you’d rather not buy each ingredient individually, there is now a kit available that pre-blends the beeswax, pine rosin and jojoba oil for you in just the right amounts. It also includes coconut oil, which is not in my recipe, but I’ve heard it works really well.
DIY Reusable Food Wrap (How To Make Beeswax Wraps)
Equipment
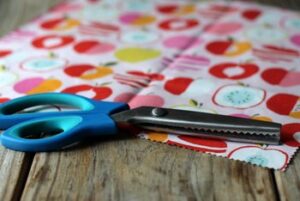
- scissors (pinking shears will prevent fraying)
- paintbrush (can only be used for this purpose)
- cheese grater
- baking sheet (I use this stainless steel one)
- thread, needle, string and buttons (optional- you'll only need these if you plan to make snack or sandwich bags)
- ruler or tape measure (optional)
- oven
- makeshift clothesline – binder clips make fantastic "clothes pins" if you don't have any on handmakeshift clothesline – binder clips make fantastic "clothes pins" if you don't have any on hand
Ingredients
How much beeswax, jojoba oil, and pine resin you need depends on the size and number of sheets you want to make. See the notes section below for my recommendations.
- organic beeswax pellets (See below for info on how much you'll needsee below for info on how much you'll need)
- powdered food grade pine rosin (Also called pine resin. This is what gives the wrap its "cling" factor – see below for info on how much you'll need)
- organic jojoba oil (See below for info on how much you'll need)
- 100% cotton fabric100% cotton fabric (Needs to be very thin, like a sheet. Organic cotton muslin will work, as will this cloth with pretty bee-inspired patterns)
Instructions
- Preheat your oven to 225F.
- Cut your fabric into the sizes you prefer. I wanted to have a small, medium, and large assortment, so I cut mine into 8×8, 11×11, and 14×14 inch squares.
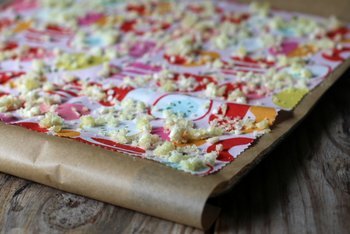
- Lay a piece of parchment paper over the baking sheet, then place your fabric on top. Sprinkle your beeswax/resin/jojoba oil mixture evenly over the top.

- Place the baking sheet in the oven and bake until the mixture is fully melted. This should take between 5-10 minutes, but can take longer.
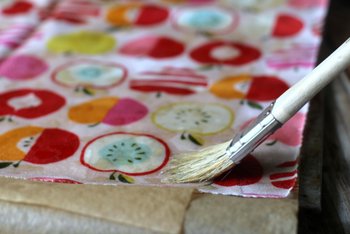
- Using the paintbrush, spread the beeswax mixture evenly over the fabric. In order to take this photo I took the sheet out of the oven, but usually I just pull the sheet slightly out of the oven, brush, and then pop it back in to let the mixture even out for another minute or so. Fyi, the mixture will adhere to the paintbrush just like it does with the cloth. I bought an inexpensive brush that I keep just for this purpose.

- When the mixture is evenly melted, remove the baking sheet from the oven and lift the sheet with tongs. I wave mine in the air to allow it to cool enough to touch (it doesn't take long it all) then hang it somewhere so that it can "set." This can be your laundry area if you have clothes pins in there. I just waved mine around until they were mostly cool, then hung them over the back of a chair to cure. You can also use a laundry drying rack if you have one, but you may want to place some parchment paper over the rungs before you place the beeswax wraps on them.
- Keep in mind that the wraps will feel very tacky at first. They mellow out fairly quickly. The end result will have grip but not be super sticky. Keep in mind that the wraps will feel very tacky at first. They mellow out fairly quickly. The end result will have grip but not be super sticky.


Notes
- 2 teaspoons grated, packed beeswax or beeswax pellets
- 2 teaspoons powdered pine rosin
- 1/2 teaspoon jojoba oil
- 1 tablespoon plus 1 teaspoon grated, packed beeswax or beeswax pellets
- 1 tablespoon plus 1 teaspoon powdered pine rosin
- 1 teaspoon jojoba oil
- 1 tablespoon plus 2.5 teaspoons grated, packed beeswax or beeswax pellets
- 1 tablespoon plus 2.5 teaspoons powdered pine rosin
- 2.5 teaspoons jojoba oil
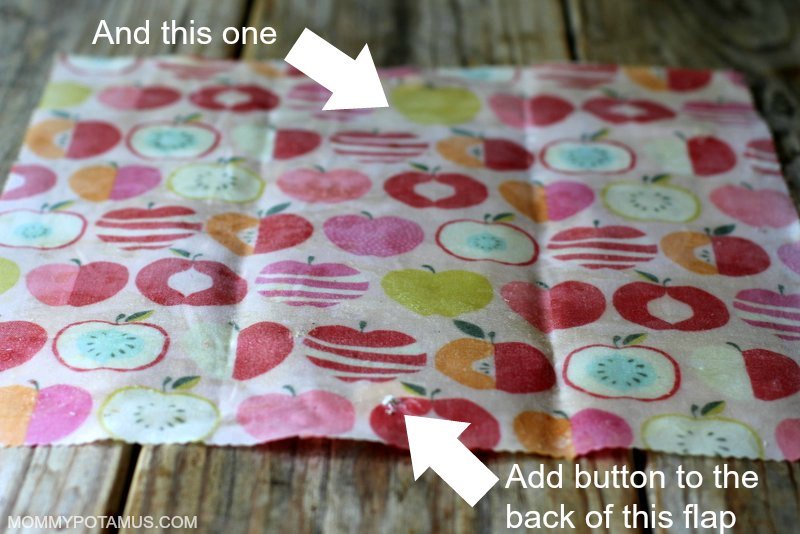
How To Make Beeswax Wraps Into Reusable Snack Bags
Step 1: Start with a 14×14 inch piece of reusable food wrap
Step 2: Fold it into thirds

Step 3: Fold the top and bottom to create flaps

Step 4: Unfold the fabric and sew on buttons as shown below
Step 6: Re-fold into thirds, then fold over the flaps and attach a string to one of the buttons
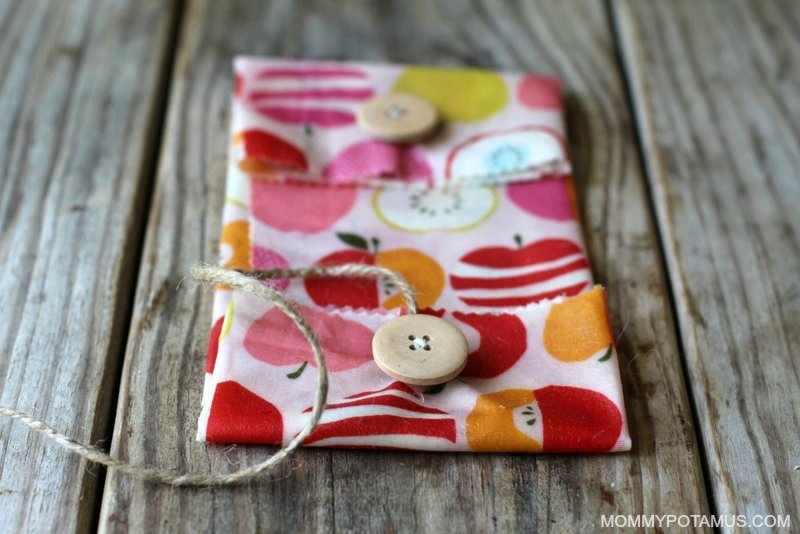
To close the snack bag, just wrap the string around both buttons in a figure eight pattern.
Frequently Asked Questions
Since I first published this tutorial I’ve received a lot of similar questions, so I’ve updated it with answers to the most common ones.
Tea tree essential oil is very different from a sticky tree resin and is not suitable for this DIY. Other resins such as frankincense may work, but I haven’t tried them so I can’t say for sure.
Yes. They can be hand washed in cool water and mild soap, then air dried.
How long they retain their cling will depend on how often they are used. My typically last about six months to a year. After that, they can be re-waxed and used again.
Yep! Here are a couple of options I recommend:
Bees Wrap Set (assorted sizes)
Beeswax Sandwich Wraps
Just one. It will saturate the cloth and cover both sides.
It is very tacky at first but will mellow out in a few days. They can sometimes take a few days to cure, or sometimes longer in high humidity environments.
Tree resin has a higher melting point than beeswax, so if everything else is melted and it’s still clumpy it may just need a little longer to melt.
Kristie shares this tip in the comments below:
“I just made a batch of these. The wax was a bit unevenly distributed, so I layered all 10 or so wraps in a stack, rolled them up somewhat tightly and put them in a 200 degree oven for about 3 hours. When they came out the wax had dispersed evenly throughout! It worked wonderfully!”
Other commenters have mentioned using an iron to spread the wax mixture evenly. Sara describes this method:
“I use an iron covered with foil. Place the cloth with wax and resin on top on a sheet of parchment paper. Cover with another piece of parchment. Iron on cotton setting with no steam until wax melts. The foil on the iron help protect it from getting wax on it. Protect your ironing board cover by covering it with an old towel or with more parchment paper.”
Some commenters have reported doing that and it seems to have worked well.
More Beeswax Projects
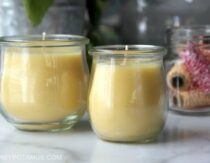
Beeswax candles – Making beeswax candles is SO. MUCH. EASIER. than you probably think! It’s little more than a melt-and-pour process, and in my step-by-step tutorial I show you how.
Lotion bars – These homemade lotion bars soften and protect skin through the dry fall/winter months, and they also work well as a summertime after-sun soother. They’re super easy to make, and make beautiful gifts, too!
Ever tried to make your own wraps like these? What other DIY projects do you love?
Want non-toxic cleaning recipes that WORK?
I’ve created a free ebook for you as a gift for signing up for my newsletter. 7 Non-Toxic Cleaning Recipes That Really Work covers seven recipes that you can make in just a few minutes each for squeaky clean windows, sparkling dinnerware, lemon-fresh countertops, and more. Subscribe to my weekly newsletter and you’ll be redirected to a download page for immediate access to this PDF ebook.

What a neat idea! I just may need to give this a whirl one day 🙂
hi could you melt the beeswax in the microwave then brush on ?
Beeswax probably doesn’t have enough water content for the microwave to heat it effectively. You might be able to heat water in the microwave, then put the beeswax in a water-bath to melt it. Beeswax in a small dish, with a larger dish of hot water under it, like you do when baking single-serve puddings.
But I think the oven method suggested above is probably the most effective. Or you could use a metal tray over a catering-style chafing dish heater (rack with large candles under it), if you don’t have an oven.
Would cheese cloth work or is the weave too loose? Trying to decide between that and Birdseye cloth.
Cheesecloth has too lois if a weave.
Brilliant thank you. I asked a company who makes this type of material to co-create with a me a line of children’s sandwich bags for school lunches. They said no – they don’t work with anyone. Sheesh – so I am going to do it on my own and I so appreciate your blog and recipe and the button closure – brilliant!!!! I was wondering how to sew them to get them to close LOL, because the wax would kill my sewing machine. Perfect!
Do you think I could sew the pouches and then dip them into a big tub of the mixture and coat the pre – made bag? I think if I coated it well enough it would seep through and cover the entire bag inside and out and voila, – pouch? Love to hear your thoughts.
try muslin cloth
what is”Powdered Pine Gum Rosin” I cant find this for sale in the UK .. is there an alternative?
I bought it on amazon.co.uk
Can find it in sports store or online. It’s used by tennis and baseball players to reduce slipping on their grip.
Can you use frankenscence for the rosin?
I bought pine tar resin that comes in small chunks. Wrap the bag with a thin towel and give it a few light whacks with a hammer. The resin breaks up easily. I premelt my mixture in a small double boiler. The resin will take longer to melt than the beeswax.
So I’ve done thus very successfully by making a batch in a mason jar and using a coffee cup warmer it does take time for the wax to melt but, it does so beautifully, never gets too hot, and there it very little danger of it spilling or catching fire. Bonus, after use, wipe rim, let cool then put the jar lid right back on. It’s ready for the next time no muss or fuss.
Brilliant way to use the ingredients! Such a clever suggestion Catherine ?
What ratios do you use for your mason jar. I am wanting to try this method but wasn’t sure how much of each ingredient I needed.
That is just brilliant. I have been holding off doing this, after having gathered all the ingredients and fabric, for want of a double boiler I am willing to sacrifice. Mason jar…. genius.
I regularly melt beeswax in the microwave when making body products. Butter, chocolate, hardened oils — all melt with no problem in the MV. Water has nothing to do with it. Heat is extremely effective at melting on oil-only products.
Beeswax melts just fine in the microwave. I melted the beeswax, pine rosin and jojoba oil in minutes in the microwave, 1 minute at a time. I used an empty pickle jar. It melted so beautifully, I highly recommend this method!
I am afraid this is an old post and I am not sure that there is anyone here anymore. I have just made them and they look great but god! I would love to know how to clean my parchment paper now…
Either go for extreme cold, put it in the freezer and it may break off, using a putty knife may work (keep the warmth of your fingers away. Or hold it by a corner and heat it with a heat gun or hair drier, keep it moving so you don’t set it on fire. It will run down.
CAN OTHER OILS BE USED INSTEAD OF JOJOBA? I LOVE THESE. I BOUGHT SOME (VERY EXPENSIVE) AND THEN THOUGHT I’LL GOOGLE TO SEE IF I CAN MAKE THEM AND VOILE! CAN’T WAIT TO GIVE IT A GO.
Why you use the jojoba oil and the powdered pine rosin? Can i use just the beeswax. Which are the benefits of these products. Thank you in advance,
How long did it take your wraps to cure? Mine have been hanging for a day and a half and they’re still pretty tacky 🙁
I think that tackiness will leave eventually, but that is supposedly what helps it to “stick” to the bowl or vessel you are using it on.
Mine are way too sticky too after a week. Can they be fixed some way?
I found some of mine wraps came out too sticky especially if the cotton was a heavier weight and also if I put too much mixture on – I painted it on after melting all the ingredients together. To overcome the stickiness, I put wrap back in the oven and when it felt warm/hot and malleable, I pressed another unwaxed cotton wrap onto it to soak up the excess mixture. It fixed the tackiness immediately.
I used a different recipe with much different ratio , 1cup bees wax to 1/4 gum and they were cured within 5 mins
I made these but couldn’t find the powdered resin so I had to use the sticky stuff that looks like tar. They were really sticky so what I did was melt beeswax, dip a paint brush in the beeswax and put a thin coat of the wax over it and it worked like a charm.
try ironing it. put the parchment on a paper towel on your ironing board and a paper towel on top of the parchment. Iron on high/steam and the wax should be absorbed by the paper towel. do it lightly so you don’t burn your parchment and repeat until the beeswax is gone.
I know what you mean! the knife I used and the tray took quite a bit of cream cleaner and heating. I guess the best thing is to have a baking tray and parchment that you just keep and reuse every time and never use it for anything else…
I don’t think so. It seems to reharden quickly. I tried also the ironing method (between two pieces of parchment paper), that doesn’t work as well either. I thought the oven method would be more of a pain, but actually is quite simple.
Hello,
Are you tablespoons and teaspoons heaped or normal? Better check before I start!!
Is gum resin absolutely necessary?
I do not believe gum resin is necessary. If you search on Pinterest “beeswax cotton wrap” there are loads of “recipes” without resin. The ingredients she posted are the same ones that companies like Bees Wrap uses in theirs (and obviously you can make them for less!). The resin gives it a “cling”. Take care.
Hi,
Love your post! Can’t to try! Questions??!!! Can you cut after the beeswax dries? Also do you only add beeswax mixture to one side? Or do you repeat the process on the other side?
Thank you
Yes – you can cut after, and only need to do on one side – it soaks through well.
Gum resin is VERY necessary. I made some wraps (or tried to) using only beeswax and they dried too hard and didn’t form to the shape of the container when I tried to use them. I recently found this blog post and decided to use those previously made wraps and try again. They came out perfect. To answer the question of the too sticky wraps, try it again and just add more beeswax. It’s too much rosin that leaves it tacky. To answer the question of using jojoba oil. Use a good organic jojoba oil and don’t use too much. It’s there to help the wax and resin combine and move through the cloth. I had a snack bag that I’d made and ‘waxed’ it too. I just placed a piece of parchment paper inside so the two sides would not stick together, put a layer of wax/rosin/oil on the parchment covered cookie sheet, placed the bag on top then covered the other side with wax/rosin/oil mixture and put it in the oven. Brush, flip, brush and hang. Once the bag was dry I slipped the parchment out.
Hi, Thanks for all these tips. Just to clarify, when you were talking about the wraps being too tachy and you said to do it again and add more beeswax, did you mean just put the too tachy wrap back in oven with some more beeswax melted on? Thanks
Did you find the rosin leaving a taste on the food. I could taste it on the cheese. Maybe I had too much? Thanks
Thanks very much for your tip on placing the parchment paper inside the bag so it doesn’t stick together in the baking process!
Hello are you using liquid or solid jojoba?
Thank you!
Antoinette
Does the Gum Rosin make it non-food safe? I like that the commercial companies use, but was wondering for pieces that are used to wrap actual food for instance, cheese,…would that be safe?! Or does it all melt together that it doesn’t matter and still better than a plastic bag! great recipe. thanks for sharing! I made one yesterday and can’t wait to make more.
I think you can get food grade rosin.
I’ve just started cranking out a few of these but I’m having trouble with the resin forming blobs. Any hints to avoid this?
I just used bees wax no resent no oils?
Mine has done this too. I think my problem is that i didnt buy powdered, just big chunks which i bashed with a rolling pin and probably didnt crush enough. Its left some yellow marks on the material where the resi blobs didn’t quite melt. Next time ill make sire ots crushed to a super fine powder
I melt beeswax, resin and coconut oil in a boiler and then I brush the liquid on the wraps. Put them in the oven for a couple of minutes, brush again so it gets even, if its not even i fold it in parchment paper and use a rolling pin to even it out. Put in the oven again for a couple of minutes and then fold it out quickly when you take them out. I have tried with only beeswax, with beeswax and coconut oil and now with wax, oil and pine resin. Its a big difference with both oil and pine resin, the wraps becomes more airtight, softer and “clingier”
Does anyone know what kind of wax I can use for a vegan cling wrap?
victoria, I just came upon these two comments from longer ago concerning vegan options from earlier on:
‘I know people use candelillia wax for vegan lip balms so I guess that would work as well as beeswax. I see that is also available on amazon and bulk naturals aromatherapy.’
and:
I’ve successfully replaced beeswax with Carnauba was in some skin care recipes – it’s a harder wax, so it might be more stiff, but if I give it a try, I’ll report back! Carnauba was is a plant-based was from the Carnauba palm of Brazil (apparently harvested from living trees, which is quite nice).
Good luck!
Elise
Hallo, again, Victoria,
It seems that my previous comment asking to please share your recipe quantities – coconut oil/beeswax/resin with me, did not go through. Could you please tell me your recipe? Every recipe on line varies so much, and I am keen to use the coconut oil instead of jojoba. Pine resin is also hard to source, so I need to be careful!
Thanks,
Elise
What is the ratio of beeswax, resin and coconut oil? The recipes I have seen seem to vary considerably.
Thanks!
Julie
Soy wax is the best. Other vegan waxes dry like plastic. I did extensive research when I decided to add a vegan version to my Foxen Organics deodorant line. I would lower the oil amount and experiment a bit first, because soy wax is very soft and you will need less to make it pliable. I hope this helps!
I just saw a company that used a non GMO soy wax with beeswax 10:1. Maybe you could just use the soy wax?
How do you find the coconut oil hold up in he finished product? It melts at warmer temps so thinking it wouldn’t be great for the integrity of the wrap? My kitchen gets warm in spring thru fall so my CO is always liquid!
Hi Victoria – just wondering what ratio of resin to wax you use ? i could only find the lumpy kind of resin so am hoping it will melt ok…
I tried mixing the pine resin with the beeswax pellets, and that worked. You could also try putting the resin in an empty spice jar with a top with holes in it, so you could better control the amount and placement of the resin. I also don’t use a 1:1 ratio of wax to resin. I use far less resin.
Me too! Did you figure out the problem or just remove the pine resin from the mixture?
same problem here! I put the temperature in the oven higher now because I read tree rosin doesn’t melt until about 300 degrees fahrenheit, but I still get resin blobs (that look yellow and it makes that the rest of the cloth doesn’t stick well).. any ideas? 🙂
following on the same issue :/
I’ve never had that issue so I’m not sure how to troubleshoot. Was the powder very fine?
I had the same problem with the powdered pine rosin not melting and so the inside of my food wraps look scaly – not pretty but still use them. I also did some wraps with just the rosin around the edges of the wraps and of course some wraps without the rosin.
Did you find a solution that worked for you or do the wraps just look a bit yuck on one side?
Further up someone said they melted the whole mixture together in a mason jar with a coffee cup warmer…took longer, but I suppose you could even microwave it. Then she brushed it on…maybe them put it in the over to make sure the fabric was saturated?
The sprinkling of ingredients didn’t work for me. I found it much more effective and easier to melt all ingredients together using a water bath and mason jar and paint the mixed and already melted ingredients onto the fabric. Then, I put the coated fabric into the oven for a few minutes which allowed everything to really permeate the fabric.
Hi,
I made these wraps, with a few minor changes on how I did it. For one, I sprinkled the beeswax on the fabric, then sprinkled pine resin dust, and then squirted some jojoba oil on, and then baked it in the oven and used a brush to smooth it all out. It worked good, but my finish product has blotches of resin on it (I’m thinking because there were some not-so-dusty pieces that got on the fabric) and I am not sure how to fix this. When I crumble the wrap, you can clearly see the blotches of pine resin and it’s literally sticky dust, if you can imagine that. It wont come off or smooth away, no matter how long I bake it for or how hard I try to smooth it out with a brush. How do I remedy this? I’ve tried looking for answers on the web and can’t find anything. Maybe it’s because I wasn’t using enough oil? If that’s the case, can I just add some to my now finished product, and will it work? I am hesitant to go out and buy another $26 bottle of oil on a hunch.
This is just what i needed!! i just discovered your blog and feel like you are the copy of myself that i have been needing to do and research all the thing i want and need to do in my life. i appreciate the research and depth of information included in the posts, it aligns with my way of thinking and life philosophies. i will be overhauling my laundry methods next weekend and making a series of these!
LOVE this Heather. Pinning and sharing!!!
This looks simple enough! I hate using baggies, but sometimes, I just don’t feel like adding more dirty dishes to my already over-flowing pile. These might come in handy.
Looks like there is this last plastic wrap roll in my kitchen drawer:D Time to make one more effort towards losing plastic from my life(: Thanks, what a great idea!
It is a wonderful feeling isn’t it! ??
How do you clean them after use? I love them!
The article states: To clean them wash with cold water and a mild soap ( I use castile soap) 🙂
I don’t know how you always find new, interesting things to post about! Thank you, I’ll be making these soon!
My grandmothe used a cotton cloth dipped in vinegar for her cheeses 🙂 I will do this as well 🙂
Can you wash these food covers ?
Yes, you can wash them in cool water with a bit of castile soap, then pat dry.
Love it!
You might also wash in water with a small amount of bleach. (1tbs bleach in one gallon of cold water) Wash and let dry without a rinse.
http://www.nfsmi.org/documentlibraryfiles/PDF/20120713093708.pdf
Hi Heather I hope this isn’t a silly question! I’m really looking for something that I can just throw in my washing machine. I would like to know if you think it would be a good idea to do this method for food wrap or wrapping up a sandwich by securing it with safteypins / clips without doing the step of the beeswax? Do you think food will stay fresh in the refrigerator wrapped up without The beeswax, if I double layered the cloth? I have tons of cotton baby receiving blankets that are flannel. I already cut up many of them to make cloth baby wipes and kitchen cleaning wipes. Do you think that these blankets would work without the beeswax to wrap food in? I would really appreciate your feedback and this before I start cutting these blankets up LOL 🙂 thank you!
Hi Chelsea, I think that would work to a degree – veggies are sometimes wrapped in cloth in the crisper for this purpose – but it won’t work as well because the beeswax helps maintain proper moisture levels 🙂
I’d be concerned about the flannel leaving fuzz on/in some foods, and about it drying out too fast.
My grandmother (who remembers when wax paper came out) said that before that, their lunch pail was literally a pail, usually with a towel or napkin over it to keep flies off the food. The pail, being waterproof, would protect the food’s moisture content somewhat. They didn’t cut up apples for the kids to take to school – whole apples last fine without wrappers. Same with potatoes, carrots, or other whole foods. Sandwich rolls held up better than sliced bread, etc. But it was also the Depression, and you were happy to HAVE a lunch.
Earlier than that, I’ve heard the cheese crust on French onion soup was an early form of edible plastic wrap. Not recommended for little Johnny’s lunchbox if he is accustomed to carefree banging around. But a Grilled cheese sandwich might be more appealing and dry out less quickly than a sliced-bread sandwich, for example. Pocket breads can also work well if the filling is the right moisture content (not too soggy, but enough moisture to keep the bread from drying to a hard crust).
In modern times, you can probably find a re-usable synthetic fabric that would not wick moisture as fast as cotton. I might consider a rip-stop nylon. I don’t know if anybody rates them for food-grade safety – as with plastics, I’d avoid using synthetic fabrics around greasy food items or for re-heating, as the grease might pick up some of the synthetic molecules from the plastic/fabric. But nylon washers are used in the plumbing for kitchen sinks, so it’s on the spectrum of being reasonably safe.
Natural fibers that might work would include smooth-weave silk, or maybe that bamboo cloth (it’s processed so heavily, it’s basically the same thing as nylon in terms of ecological impact).
You can purchase or make your own waterproof machine washable food bags from food grade PUL a material used in modern cloth nappies. You can purchas food grade PUL from PUL Fabric Fanatic. Just sew into desired size with good quality nylon thread and close with a zipper or button and tie.
PUL fabric is made of polyurathane – not really a great way to avoid chemicals.
I would not recommend using flannel in the oven. It has a reputation for being pretty flammable. Definitely stick with cotton.
I use an iron covered with foil. Place the cloth with wax and resin on top on a sheet of parchment paper. Cover with another piece of parchment. Iron on cotton setting with no steam until wax melts. The foil on the iron help protect it from getting wax on it. Protect your ironing board cover by covering it with an old towel or with more parchment paper.
I would imagine that would be synthetic flannel. You can get wool & cotton flannel. It wouldn’t be any more flammable than regular wool or cotton fabric.
I have some of these that a friend made me last year! I love them 🙂
Wonderful! We try to avoid plastic wraps and baggies, but every once in a while it’s too convenient to resist. Rookie crafter that I am, I would love to try these.
Heather, any online sources of organic cotton? Our local fabric stores don’t carry anything organic and I have been searching. Thanks!
You can buy organic cotton fabric from:
fabricworm.com (gorgeous prints in organic quilting cotton, plus organic solids)
organiccottonplus.com (cheap source for plain, unbleached, undyed muslin)
Look for GOTS or oeko-tex certified, because it goes beyond organic into the processing and dying of the cotton.
You can also get organic beeswax, but it’s harder to find. Try etsy, and scrupulously interview the seller. Make sure it’s from USDA certified bee operations, in order to prevent wax that’s impregnated with fungicides and worse to be next to your food. Many pesticides are fat-soluble, which means that they are gathered by the bees from foraging activity, and end up in the wax. Better not to eat them.
Certified organic bee products should be vanishingly rare since the bees’ forage area is pretty large (at least 2 miles in all directions) so finding an area that is entirely organic in a 2+ mile radius and would support bees isn’t easy. Most bee products labeled organic don’t really meet that requirement (and some some from other countries where they don’t have to meet that requirement).
Better would be getting to know the beekeepers and finding out what they use on their hive and where their hives are located.
Joann’s has Cloud 9 organic cotton for $14.99 a yard. I bought some at 50% off.
@Melinda. can you share how you clean them?
This is just unbelievable to me, didn’t know it was possible! Awesome!!
I like the idea But wouldn’t the wax crack and fall off the material after it dries?
No, the beeswax soaks into the fibers of the fabric. But washing in hot water will remove the a good portion of the beeswax making the wraps air permeable
My Mother made these in the 50’s! Brings back memories.
can you wash them ?
Does the food wrap *stick*. Does the beeswax have the ability to make any kind of seal with the tops of bowls, etc?
I’m excited to make this, btw.
~Angela
The pine tree rosin is what adds the “cling,” factor. It’s much less clingy when beeswax alone is used, although there is some “grip.”
Hi there I love your pots! Your pine tree rosin link came up as diamonds on Amazon. Could you share the name brand etc again please? Thanks!
So I find this very inspiring. However, I’m struggling with the clean factor. I’ve tried three. I did one in the oven, and two with an iron between parchment, because the oven left strange blotches ( the rosin I think ). I’m finding that they dont hold their cling, and also, they leave a resedue on the dishes… Do they improve with time? Or maybe it’s the rosin? I bought it at a music store in a bar and pulverized it in my magic bullet. It has a couple added igredients in it, but they are castor oil and beeswax which shouldn’t make a difference. Help?
I’m having the same issue. I’m wondering if less beeswax is better.
This sounds hippy dippy but I used resin straight from the tree and did not have issues with it mixing well, it all melted together well over the double boiler and then I just kind of slathered it on in the baking sheet and didn’t bake, and then hung them to “dry” and they turned out for me.
Now, I realize not everyone has a pine tree around but this was what worked for me.
I bet it was the method in which I did it tho rather than putting it in the oven
I had a pine tree in my yard and went and (wild crafted)- aka scraped some off my tree to use. In its raw form. So maybe if you have a tree around that you know isn’t sprayed with anything….
Hi there,
I’m having trouble sourcing Pine Resin Powder. Is there another substitute I could use? For example, will Myrrh Gum Powder or Frankincense Resin Powder have the same effect? I’ve come across these, seem easier to source.
Any suggestions on what kinds of stores sell Pine Resin Powder as online seems limiting.
Brauners Castile soap and cool water, kitchen clothes line dry
Search under Dr. Bronner’s Castile soap. Lots of options.
What an excellent idea! I hate using plastic wrap… but sometimes you just need it. Until now. 😉 My mother recently gave me my grandmother’s old sewing basket (FULL of cool stuff, much of which I can’t identify)… and it included piking shears! No lie, I’ve been *looking* for a project to use them on!
Thanks for this!
~ Christine
i made these with an iron and parchment paper over, but this oven way seems better, less messy. i handwash them gently, and air-dry. if wax its too thick they will crack, and eventually they do need re-waxing.
I found the iron method spreads and coats the fabric in a uniform layer better. But then I have a separate ironing board cover now (just for making these) since the wax did soak into the cover and pad. And you have to wipe the hot iron with paper towels or some spare extra fabric you intend to make into future wraps to get all the beeswax off the iron. – my husband irons his own work shirts (his work shirts cost way too much to starch with beeswax!) so now I have a cheap-o iron just for my wrap project to make more. (bridal and christmas presents too!)
Learning curve bumps
Wouldn’t a sided cookie sheet work as an ironing board for this?
So the beeswax makes it stick? Is it washable?
People, read the original post! She’s explained three or four times now that they’re washable with cool water & mild soap, like Castill soap.
NickandBecky Gehm – this made me think of you!
How do you store them ,don’t they stick together ? How long do they last ? Do you re wax them over time ? Or just make new ones ? More information needed . But I do like they idea .
Heather says hers lasted about a year. After that, she said you can rewax them to keep using them. As far as storage, maybe store them in a container with wax paper between them. I haven’t made these yet, so I’m not sure how sticky they are.
I keep mine in a large waxed cloth bag I made just for that purpose, folded and ready to grab easily in a drawer
will be so liberating to get rid of plastic baggies!! Huge thanks!!
I love the idea! I’m going to make these as a birthday present for my boyfriends ma. ^Same questions as Shirley, though. What’s the best way to store them and how often do you re-wax yours? If they do crack could you just stick them back in the oven & thin it out?
(I just ordered my beeswax, I’m really excited!)
Ooh Brittany
This looks great but would be little too a ambitious of a project for me at this point in my life! I would, however, be interested in buying these ready-made from someone! Know of anyone who makes and sells these?? I’m guessing Etsy would be a good place to start…but I love getting recommendations for vendors!
I have seen some on the grommet.
BeesWrap, Google it!
If you live in the states you can order these from ETEE. If you live in Canada you have to order them from Etsy. I bought my first set and love, love, love them!! Now I am going to attempt to make some.
Candace, these are similar to Abeego wraps, but the Abeego’s work a little better (if you can afford them) they are a bit stickier. There’s also Bee’s Wrap which is similar to Abeego.
If you were putting things like raisins, cookies, crackers or nuts inside the reusable bags would you really need the beeswax?
Your link isn’t working for me 🙁
Megan Stoiber – They can be folded and stored in a basket on the counter for easy access. The amount of time needed before re-waxing depends on use, but it can be 6 months to a year. I think you could possibly thin it out by reheating the sheets, but for best results I recommend taking the “less is more” approach and adding some if needed.
Very cool!
Sarah Buehrle
Michelle DePalmo
I sell tbese on my website! They’re called Bees Wraps. The maker of those uses jojoba oil as well. They smell wonderful and are a fantastic solution.
I love love love your Beeswraps! And it was crazy fun to learn to make. But yours are the best and I now admire your hard work and ingenious product!
I was wondering about using other oils – old-fashioned oilcloth (for sailors’ all-weather gear, e.g.) used beeswax plus another more flexible oil. I might try mixing the beeswax with something a little softer like coconut oil or even a small amount of olive oil, to get that more flexible finish. Like first make a salve with food-grade oils, then apply to the cloth as described.
I’m also wondering about whether they can be used with cured meats, since the cure would help reduce spoilage.
One of those things I have to learn with non-disposables is to be on top of things and not LET them get to the totally-nasty spoilage stage. I guess a wax wrap could be boiled and re-waxed, or shredded and burned in the wood stove, if it got trapped in one of my back-of-the-fridge disasters. There’s a natural life cycle for any re-usable cloths or rags; they are durable, but do not last forever.
Did you ever end up experimenting with using other oils? I was considering trying coconut oil or perhaps another more affordable plant based oil
Did anyone try coconut oil? I saw that the wraps available for purchase have coconut oil listed as an ingredient, so I want to give that a try since I have it on hand.
I used coconut oil in mine, just a teaspoon dabbed all over the cloth a bit then sprinkle my beeswax across – and ironed them. I’m getting the Pine Rosin to make them sticker for my next round. Quite happy with how they turned out!
Love it! When I shared it an ad for a dehydrator popped up. Thought you would want to know.
The dehydrator is the current Mommypotamus giveaway, not an ad. 🙂
These look great, but how do you clean them? Hand wash and hang dry? Machine wash cold, hang dry? Cleaning and care advice would be very helpful. Thank you 🙂
These look great, but how do you clean them? Hand wash and hang dry? Machine wash cold, hang dry? Cleaning and care advice would be very helpful. Thank you 🙂
Hi Zoya, I wash them in cool water with a little castile soap, pat dry with a towel and let them air dry on the counter.
Can they just be thrown in the washing machine? Dryer?
Did you read the article…. or the comments???. Sheesh!
Kay, I couldn’t agree more! Don’t people know how to read anymore? The answer was right there! Btw I have made these using beeswax only and carefully melting the grated wax onto/into the material in a sandwich press. Making sure to put parchment paper on both sides of the material after laying the beeswax on, to protect the press. Worked a treat! But do take great care with HOT beeswax! When you want to use it, the warmth from your hands moulds the wrap around any containers.
Wash in cold with a mild soap (like castille)
Can I use the beeswax pastilles? And maybe you might make an update to the bottom of the actual post about cleaning them so you don’t h e to keep answering tht question? Or clarify the instructions a teeny bit in the original post? It’s a very popular question! 😉
Hi Tori, yes beeswax pastilles will work just fine. And though I did include cleaning instructions in the middle of the post I think I’ll take your suggestion and put it in a second time – it is a very popular question!
Hi. Do you think soy wax could be used instead of beeswax ? I have heaps left over from my past candle making life ?
Do you think bamboo, hemp or silk fabric would work ok?
Sometimes I put a plate over the bowl instead of wrap. My small plates fit perfectly and I don’t miss the cling.
I didn’t know about this. Make sure you are using eco fabric as well, since a lot of dyes and chemicals are used in the process to make fabric. I am just too lazy, so I just put a plate on whatever bowl or plate that goes into the fridge to save food. A good way to stack things too since it all get sturdy! I have lots of plates, so there’s always enough! lol
I do this too. Isn’t it an excellent way? I love the stacking advantage too. 🙂
I know I shouldn’t say negative things, but I find it annoying how many people have clearly not read the post properly. It’s mentioned twice that these clothes are washed using castille soap and not hot water. There are at least 10 people asking how to wash the beeswax soaked cotton cloths.
Thank you so much for these lovely ideas that you post to share with us,I want to ask if these wraps can be used for the freezer as well. If not please ..please find for us another way to store food in the freezer.
Reem, I have never tried using them in the freezer but I doubt they would fare very well. I use glass containers or plastic baggies lined with parchment paper. Not the best I know, but I use the same baggies over and over since they don’t come in contact with the food.
Wide mouth jars work well in the freezer. Make sure they are wide mouth. I use glass and just leave enough room so anything wet inside can expand, but they do make plastic freezer jars you can buy at the store. Reusable plastic peanut butter jars might be an option too.
This is amazing!!! I’m all over this!!! I hate plastic wrap and this seems like an amazing substitute.
I am so excited to make these! I have wanted Beeswrap for a long time, but had a hard time giving in to the price. I thought about trying it myself but it will be so nice to have an actual tutorial!
Hi there Heather,
My friend and I just made these today! They turned out uber sweet, and we had a ball, its hot here in Australia and they work perfectly….thanks its great. We use plates to cover food but this is just perfect!
Elisabeth
awesome. I’ve had the bees wrap on my wish list but I have beeswax in the house and I’m going to try this! Thank you!
Hey these are great, I am 100% sure my Granny had something very similar to these. Beeswax is so affordable, especially with the multiple uses, and if you use repurposed fabric, you could make a ton of these in many sizes. I love the frugality!
Just one question, though, how do you wash them? JUST KIDDING. 😉 My serious question is, what’s the best way to store these, do they get “flimsy” if it’s warm (summer)?
Haha! Loved the washing question. I store mine in a cabinet. They won’t get flimsy unless your house is really warm 🙂
Interesting. An excellent idea and demonstration.
I have written on other forums about how we used to make waxed muslin when I was a child in the 1940s – in rural western Kentucky. My grandpa’s farm was fairly self-sufficient and while he was willing to spend money on anything needed, he believed the war effort was more important than certain things – such as waxed paper or any other item that was discarded instead of reusable.
We had “napkin stretchers” for linen napkins (similar to the huge curtain stretchers for lace curtains) – just a wooden frame with pins all around the edges on which to hook the edges of the wet napkins – so they dried flat so ironing them was less of a chore.
We also used the stretchers for unbleached muslin squares or rectangles and rubbed beeswax, which was in a big chunk, into the muslin, which was then ironed, usually it took me a couple of tries to get an even distribution because I was a child and didn’t have the strength of the women who worked in my grandma’s kitchen. They tolerated my “helping” but I did learn something.
The test was when the cloth would hold water without leaking.
Some longer lengths were formed into pouches, basted part way on each side – so the pouch could hold yeast dough with the pouch hung on the wall behind the big kitchen range.
The young women who tended the chickens and brought in the eggs also made hooded short capes to wear when going out to the coops in the rain.
I still use waxed muslin for some kitchen tasks and I also waxed one of my linen dough couches which I use exclusively for doughs that contain a lot of candied fruits and spices.
I greatly enjoyed reading your story.
Thanks for sharing your childhood experiences.
What an interesting idea! I haven’t heard of doing this before. I’ll have to give it a try using an organic cotton, or some other non-chemical material. Thanks for sharing!
I recently found bees wax pelts on Amazon. That would eliminate a step. Just thought I would share.
This looks awesome! Any suggestions for a vegan version?
Not that I’m aware of, sorry!
What about carnauba, or soy wax? Or paraffin?
i was also wondering about a vegan alternative..just having looked at the 3 alternative waxes briefly, i would be inclined to try soy first. parrafin is derived from petroleum, coal or shale according to wiki. carnauba is used in car and surfboard was. sounds gross. soy – to me anyway, sounds like a more environmentally/vegan friendly choice. but wiki also says it has a lower melting temp. so you would have to let hot foods cool, which you want to do anyway before putting something in the fridge and store in a cool dry place. that’s just my 2cents. haven’t tried it yet.
95% of the soy crop in the USA is GMO. Do you really want GMO foods in your diet?
And soy is not good for female hormones ?
Soybean oil (to make the wax) is made using hexane, a solvent derived from petroleum and crude oil. Soybean wax is hydrogenated. At the lower melt point I’d be careful that a soy wrap doesn’t touch any of your food, if you are wanting to avoid the chemical exposure of plastic wrap.
Argentina has become a giant experiment in farming genetically modified (GM) Roundup Ready (RR) soy, engineered to be tolerant to Roundup, Monsanto’s formulation of the herbicide glyphosate. In 2002, two years after the first big harvests of RR soy in the country, residents and doctors in soy producing areas began reporting serious health effects from glyphosate spraying, including high rates of birth defects as well as infertility, stillbirths, miscarriages, and cancers.
I used to drink soy milk for a few years. I developed m.e. (Chronic fatigue syndrome) about 12 years ago. I moved abroad and couldn’t find soy milk anywhere, so started using home made almond milk and my health started to improve gradually. I put it down to a sunnier climate and didn’t make the connection to soy until recently and it all makes sense now. GM soy affects your hormones and that was enough to throw out the balance in my body. 4 years of suffering debilitating symptoms due to GM food has made me super cautious.
Now, coming up to 71, I’m healthier than ever and it’s so good to read about home made, healthy alternatives to plastic. Thank you for this and all the feedback in comments.
I know people use candelillia wax for vegan lip balms so I guess that would work as well as beeswax. I see that is also available on amazon and bulk naturals aromatherapy.
I got a few of these at a farmers market and love them. The woman who made them from used bed sheets, not organic necessarily and she was very careful about washing them prior to waxing. Gonna try this. There are several Etsy sites with them for sale.
Carnauba is also used in many food products! 😀 so not really so gross 😉
I’ve successfully replaced beeswax with Carnauba was in some skin care recipes – it’s a harder wax, so it might be more stiff, but if I give it a try, I’ll report back! Carnauba was is a plant-based was from the Carnauba palm of Brazil (apparently harvested from living trees, which is quite nice).
please let me know! interested in a vegan alternative.
I pinned it! I am getting ready to make these. Hello from Anything Goes Linky.
hi. great tips, thanks! i’m wondering about the jojoba oil someone mentioned. how would you add this? also, if i live in a hot climate you mentioned they can go flimsy. imagine this shortens the life of them a bit? thanks!
Or you can purchase Abeego, the reusable food wrap infused with beeswax, tree resin, and jojoba oil. They come in flats as well as your snack packs. Plus abeego can last up to a year depending on how you treat them and is also 100% natural and compostable. http://abeego.com
I bet the method above could work to refresh the Abeego wraps for another year or two.
My husband hates dealing with plastic wrap! Because of that, I most often do transfer foods into my pyrex dishes, but I still use the wrap on occasions where I have a large bowl of leftovers that doesn’t conveniently fit into a lidded bowl, or all my pyrex in already in use, etc.
I’m going to have to try this at some point and see if it makes those occasions a little more pleasant than dealing with the hated plastic wrap.
Will this work with soy wax instead of bees?
Hi Kristen, I’m not sure. I don’t typically use soy because most that is grown is genetically modified, and also because many soy waxes contain additives such as paraffin.
How do you store it and can it be folded?
Hi my name is Jasmin and this is Naomi. We live in Torquay.We go to st Therese school.
We are asking if you know any food that don’t have plastic wrappers. By the way we are kids.We would love
Some advice.
I think I will try this with paraffin! Should be cheaper to make.
This worked really well! Thank you! Be careful with the hot sheets and work quickly when hanging them up. Also, use an old cheese grater it’s messy to clean
I’m glad it worked well for you, Lindsay!
I admit I didn’t read all the comments, but many people seem to be using the beeswax pellets from craft stores. These are intended to make candles and cosmetics and are not food safe. I think it would be better to use pure beeswax and grate it yourself.
You can buy 100% pure beeswax pellets. I made this a few years ago, with just the wax. Didn’t have much grip (it was winter and I keep my heater at 67) but I’ll give it another try and add a bit of oil to the wax.
You got me started making beeswax candles and now I’m making beeswax body bars and creams. My husband now breaks up my six pound blocks of beeswax by placing it in a heavy plastic bag and dropping it on concrete. Learned by a happy accident. Lol
This will be my newest project. But how do you clean them? *slapping my forehead*
Hello,
if you freeze the beeswax and put it into a bag, it shatters into little pieces when you hit it with a hammer or drop it.
Do you put the beeswax on one or both sides?
Only one. It will saturate the cloth and get both sides covered.
I tried with one side, which seems fine but I think they are too sticky! Maybe less oil?
It worked fine for me today. Put it in my craft idea folder. 😉
Did anyone try to make one with jojobal oil and tree resin. I quote the creator of Abeego:
“As the creator of Abeego I would like to say that sheet of fabric coated with beeswax will not have the same properties of an Abeego. Abeego is moldable, slightly adhesive, does not crack, has a much higher melting point and is resistant to both water and oiI. Beeswax on its own will not have these qualities. I encourage the DIY community to take action and find ways to avoid using plastic but please understand that the infusion used for Abeego is more complex then this project suggests. Happy waxing!
Toni Desrosiers
Abeego Designs”
Haven’t tried it yet, but I would think you could mix your oils the same way you do for a salve. There are lots of online instructions for salves. Then shave onto the fabric and heat, as described here.
If you have a good candy thermometer you could try to make a mix that melts above 200 F, which means you could use warm/hot water on it up to about 150 F without taking much of the wax off. A very messy project, but fun if that’s your thing. I think getting the Abeego ones will be easier on your kitchen if you have no interest in coating pots with a durable and sticky wax.
I have tried both with and without the resin, and like it much more with. I updated the post to reflect the current recipe I am using. 🙂
Hi Heather!
I write for The Keeper Cup and we are currently writing a “Waste Less and
Be Green in 2015” series. We are providing weekly tips towards being Zero
Waste. I featured this food wrap DIY in a post recently and wanted to
make sure you knew about it. The post can be found at
http://keeper.com/waste-less-and-be-green-in-2015-week-11-challenge/
Feel free to share it as you’d like 🙂
Hope you enjoy the post and let us know if you’d ever want to do a post
swap or write a guest post. I know our readers would love to hear from
you!
Thanks,
Olivia
Way too much fun. I haven’t tried it yet but am totally geeking out on the possibilities.
Thanks for sharing.
-Erica W
Hi,
I love these wraps and use them often, thanks for sharing such a great idea, down with plastic!
I’m wanting to make the snack wraps and stitch a wee button on as they look just so sweet, do you think I need to wax the cotton used for the button to ensure it lasts as long as the wrap itself?
Thanks,
Jaimee
Can they be made without the foil? Heat in foil breaks down the aluminum which comes of in minuscule flakes on whatever it touches (the wraps). It’s really not recommended around heat and food.
I made these last night. My wraps are quite hard and don’t seem to stick when I fold edges. They just slowly unfold again. I made one with a lot of wax and sone with not so much. It didn’t seem to matter. I used cotton and bees wax. Also when I fold they leave a white crease. Any ideas.
Hi there – do you brush both sides with beeswax, or just the side facing the food? Or the side not facing the food?)
WAKE UP CALL
I’d like to bring up a point that isn’t going to be popular, but it’s something that everyone should consider when using beeswax or buying a food wrap made with beeswax and that is beeswax contains contaminants, many of which are downright nasty! We are living in a very polluted world, the bees incorporate the environment and all it contains into their comb and honey, the pollutants A thru Z are there too, mixed in with nature’s good stuff. There is no 100% pure organic beeswax. Pollutants travel, weather happens.
As a newbie beekeeper I love the idea of making beeswax wraps, I wish plastic wrap had never been invented, I use baking parchment instead, but beeswax just isn’t the pure thing we all would like to believe it is. Do a search; “types of contaminants in beeswax.” Even new freshly drawn out comb although pure white in color (what bees make themselves without man’s intervention) likely has some level of pollutants.Perhaps the positives outweigh the negatives but I think y’all should be aware and make an informed decision before putting it against your food.
I think the chances of contaminating food because of *possible* beeswax contaminants is pretty small. I’m a beekeeper too and I love eating chunk comb and I also chew on the wax. I like living a less paranoid existence, myself;)
Eating a bit of wax from your honey bee gathering area is helping your imune system to manage/fight the pollens/toxins commen to your area.
We in Australia have fewer pests/deseases, don’t know if I would chew on honey or wax from veroa mite efested hives.
I am also a beekeeper and can say that by buying food grade wax or honey you are taking away any healthy properties that they have to offer….which is ALOT. Naturally antibacterial, antifungal and full of nutrients. The likely hood of bacterial living on raw honey or wax is very slim.
If it is so polluted, why would you even consume your honey?
Foundationless beekeeper here!
Two questions:
1) where do you find your Muslin cloth? Love the print in the photo but I can only find cream cloth
2) what do you store your reusable wraps in in the kitchen? Not sure where to out mine!
Hi there, it’s River, Amy’s daughter. I am 9yo.
I did this as part of my Little House on the Prairie project (I do homeschooling). It went great. We did the wax in three batches.
Could you please tell me what size has been the largest wrap you have ever made?
with thanks
River Alice Boyd
The 14×14 square. Your Little House on the Prairie Project sounds fun!
Excellent! I recently read that pizza boxes increase the risk of miscarriage x16, as the “grease proof” is a flourine polymer (here’s me thinking it was waxed) which is an endocrine disrupter. Its a version of teflon. It’s in food wrapping, sports clothes and furniture(stain resistant coatings). Got to thinking about coatings and food storage and wondered how I could make my own. Thanks.
I’d like to make these with a group, but if we multiply out the time in the oven, it will be a 24 hour event. 🙂 I’m wondering if I could melt the wax in a double boiler and just paint it on to skip the oven step. Do you think that would work?
Hi Tanya, Our sustainability group in Western Australia does a Beeswax Wrap Workshop to encourage people to use less plastic. We use irons that are pre-fitted with a couple of layers of aluminium foil. Place baking sheet beneath and above the muslin/cloth that is sprinkled with the grated beeswax. If you Google beeswax wraps you will find videos for this other method that allows lots of people to make them in a fairly short time. We even do it at Fairs. This method looks interesting too though. Would love to find out how they do the jojoba and resin applications 🙂
This is such a clever idea to make a reusable food wrap. It’s so simple, but the majority of us never thought about something like that. Thank for the idea!
Can’t wait to try these. Want to send to missionary friends in poor country.
Hi Heather,
I would love to have my first graders make these for Mother’s Day gifts. I noticed that you show pictures of cloth with what looks like crayon. It would be fun to have kids do a picture on unbleached muslin, then wax it. Do you think it would work? Would it be food safe? Great idea!
Mary
Hi Mary, I don’t think they’d be ideal for food use unfortunately.
I have just made my first wraps, trying both the iron and the oven techniques, and they do not stick as well as the Australian ones a friend gave me which have jojoba oil and tree resin in them as well as beeswax. Do you think I just need to add more beeswax? or is the fabric I used too thick perhaps? Also how would I apply the oil if I get some? with a spray? Thanks for any advice you can give me to make my wraps stickier!
these look great & i definitely want to make them at some point. 🙂 i was squishing a piece of lemon in one of those tiny crystal mason jars the other day and thought that didn’t really work so well.
another vegan wax option i’ve heard about (from my diy skincare book by the nerdy farm wife) is candelilla wax which is from a plant. she says to just use a little over half as much as the amount of beeswax called for though, e.g. if a recipe calls for 5 grams of beeswax try 3 grams of candelilla wax. fyi, it can have a strong smell sometimes in finished skincare products.
I’d love to make this by weight instead of my measure…do you have a chart listing how much rosin and wax weights? Thanks!
Hello everyone,
My friend and I make beeswax wraps but have very different measures of ingredients to the original post.
I have not experienced any stickiness and the completed wraps are flexible enough to seal around things without cracking.
I have only used Jojoba oil to date but am keen to experiment with other carrier oils.
INGREDIENTS
-50grams Beeswax
-12grams Resin (Pine Rosin) – if in large pieces, break up – a rolling pin works well
-10ml Jojoba oil
OTHER ITEMS NEEDED
-Kitchen scales
-Cotton cloth – we use pillow cases and sheets for lots of colour variation at minimal cost
-Pinking shears (or scissors to cut cloth to desired size)
-Small paint brush
-Small pot (double boiler is ideal)
-Baking tray
-If making very large cloths that don’t fit on a baking tray you will also need baking paper or foil and an iron. Remember to protect your iron by placing foil or baking paper on top of the waxed cloth before ironing 🙂
-Clothes horse or some other method of hanging the cloths to set.
METHOD
1: Melt all ingredients together in a pot on the stove
2: Place cloth pieces in single layer (cut to desired size) on a baking tray
3: Using a paint brush cover one side with the melted mixture
4: Place baking tray with coated cloth in oven set to 100C for 2 minutes
5: If you like run the paint brush over the hot cloths to smooth out the liquid wax mixture
6: Hang up to dry for a couple of minutes – if it takes more time to set the wax wraps than just the time to cool down then I would suggest your mix is wrong.
7: Viola use your cloths
EXTRA COMMENTS
There are no rules for storage, I just roll mine up and keep on a shelf in the pantry, but there are plenty of ideas for storing the wraps in this post. I liked the ‘use waxed or baking paper in between layers of waxed cloths’ idea but have not tried it myself.
If you freeze the cloths they will crack and you may need to reheat in the oven and get out the paintbrush to smooth out the wax mixture again.
Refresh your wraps when they appear to have lost some of the coating (but you shouldn’t have to do this for many months)
Cleaning 🙂 They are covered in wax, wax melts! so don’t use really hot water to clean them. Most times they can be wiped down with cool/tepid, even warm water and some mild soap then air dry. If they are really grubby toss them out and make some more or wash them in hot water and recoat with wax/oil/resin mixture.
PS I’m in Australia, it gets pretty hot here and have not had any trouble with the wax cloths melting and making a huge mess but if you are really worried there are always places to store things that melt in excess heat, like dark cool cupboards or if necessary the fridge.
At what temperature do these start to melt or become tacky at after being made? I’m thinking they would make a mess in a warmer climate, or even in my house. Also, do they leave a sticky/waxy coating on your dishes when used used to seal the tops of containers?
To all those looking for a vegan option, why aren’t you using jojoba oil? That is from a plant.
Do you only coat one side of the fabric when you do this?
What if my wrap still came out a little sticky? I let any extra drip off and I even used a spatula to scrape off any extra before the mixture dried and set. All of them leave behind a film on the container I place them on as well. Any tips?
It is very tacky at first but will mellow out in a few days. 🙂
Hi! Is the pine gum rosin safe to use with food? By the way, I bought the kind you recommended directly from the family-owned company that is listed on amazon and it was much cheaper!
Hey there, just wondering if you have a link for this one. I bought a powdered rosin, but some was still in chunks and even though I ground it down…it just kind of came out a mess. Thinking I might have bought the wrong one!
GreAt Job Heather!
One question: At what Point do You add jojoba oil And resin?
Hi,
Thanks for that amazing DIY, I’ve been looking for such an idea for a long time, and this one is just perfect.
About the rosin- I currently live in Israel, where Amazon do not ship this product. Any ideas where can I buy it? what kind of stores might have it? are there a few kinds?
Trying to figure that out, I read online there is a difference between rosin and resin, but rosin does not look like the stuff you are using, while resin does. So now I’m not even sure what to look for, will appreciate your help on this…
Hi Zipora. I bought pine resin powder from Greece through Ebay. It was called colophony rosin powder for ballet. It was only powder of its type I could find.
Hi Heather! I just tried making some of these, but the pine resin powder just seemed to clump when it was heated and not combine with the beeswax and oil. What am I doing wrong?
I am excited to try this! I am wondering what the purpose of the jojoba oil is? I know it’s a wax, too—but is it necessary?
It adds flexibility to the wrap 🙂
Will the smell transfer to the food? Does it make the food taste and smell differently? I would like to try these, but my family would freak out if they made the food taste strange.
Thank you! I was gonna try reinventing this at Home, since it is pricey to buy and I need to rewax a couple I did buy, but you have saved me the trouble of figuring it out on my own. Thank you so much, I can’t wait to try it!
Do you think it could be possible to use another type of resin? I read in the reviews of the bee wrap that it has a strong pine scent. I see that frankincense is also a tree resin. I wonder if it would work. What do you think?
Unfortunately, I don’t think so. In my experience frankincense resin isn’t as sticky as pine resin. Since the function of the resin is to help with cling, I don’t think frankincense would perform very well for this project.
hello, is necessary to have a separate cheese grater only for this project? will the beeswax come off of the cheese grater?
thank you for sharing this recipe! i have had success with only clothe and beeswax but am looking forward to trying your recipe with resin and oils.
Hi, is there a substitute for pine rosin? Or does it have another name?
I’m finding it hard to source in Australia and Amazon won’t ship it to me…
Any help would be great!
Thanks
Shan
This might be a dumb question, but do you have to coat both sides of the fabric? I read the directions twice but could have missed it.
Thanks,
Heather
No, you don’t. Once it melts it will saturate both sides 🙂
Hi Heather,
I’m having trouble determining what kind of cotton I need to buy, specifically, what thickness or weight. Do you know what “gsm” the fabric that you used has?
Thanks!
Hi,
Did you figured out the fabric weight? I’m hesitating between Lightweight and Very ligthweight
My wraps are too sticky and leave residue on my hands after handling. Any suggestions?
If they’re brand new they’ll be much easier to use in a few days. 🙂
Hi Heather. Thanks! This is great! Two questions – where I live I would have to import the jojoba oil at a crazy price – could I substitute successfully with coconut oil which is cheap here. Also, how would these behave in the tropics with high heat and humidity? Thanks again!
Hi Heather,
I just bought new fabric to make these. Should I wash and dry the fabric before making these?
I would 🙂
Thank you so much!
From what you’re describing, sounds like you’re only painting/waxing one side of the fabric. Am I missing a step? Shouldn’t both sides be waxed? Please help!
When the wax mixture melts it saturates the cloth, so both sides are coated )
I live in Australia and am finding it hard to locate pine resin powder to make the reusable food wrap. Is there an alternative? Or is it essential?
Hi, Heather
I am trying to make Food Wrap. I did a lot of research. I have 2 questions. Can you help me?
What is the difference between using tree pine rosin or using tree resin? I am so confusing.
And can we eat rosin? I worry because the intro in amazon said tree pine rosin is not for food use.
That will be great if u can answer me. Please help! Thank you.
Hi Heather,
I want to make a lot of wraps for family and friends Christmas presants. I have heaps of wax from my bees. I am trying to find the quickest method of waxing the cloth. Can the fabric be dipped into a pan of hot melted wax, then hung to dry? Or can the hot wax be brushed directly onto the fabric? Please let me know of any other methods, and any tips for speeding up the process.
Thanks
Hi!
I just love the idea and I tried it a few days ago. It’s great to wrap everything! I only have 2 questions. Will the smell will slowly fade? It smells like pine a lot. Also, I followed the recipe but mine doesn’t stick on bowls. I can only use it to wrap things so it sticks to itself. Do you have any idea where I might have gone wrong?
Thank you!
Yes, the pine smell fades. To wrap bowls you need to press it on and let the warmth of your hands rest on it so that it will adhere 🙂
I tried it with just beeswax and seems to work just fine. What is the benefit of adding the oil and rosin?
The oil makes it more flexible and the rosin makes it more clingy 🙂
Hi Heather. I have been working on these for quite a while today. I have finally figured out what my problem is. The pine rosin isn’t spreading, it’s clumping but the wax and oil is spreading. So my fabric is sort of speckled with dark yellow spots that are thicker than the other ingredients. It won’t spread with the paintbrush even after it’s been in the oven for a while. When I try to spread it it clumps on the brush, too. After it dries and I apply the fabric to a bowl, the clumps of rosin crack and flake off :o(. Any suggestions? I even put the rosin and beeswax in a coffee grinder to get to an even powder consistency but that didn’t seem to help. I’d sure like to give these as CHRISTmas presents but I just can’t do it with the way they look right now. Any advice?
Hi Pamela, I’m so sorry you’re having trouble. Once the rosin melts in the oven with the beeswax and jojoba it should spread easily with a brush, so my guess is that it has something to do with the particular batch of rosin you have. Unfortunately I don’t have any troubleshooting advice on this one because I haven’t experienced it – sorry I can’t be more helpful!
I contacted the owners of the pine rosin company (diamondgforestproducts.com) and got great results! After explaining what I was trying to make and what was going wrong with the rosin, I asked for a new, fresh bag. They sent it out the next business day! I am hopeful for a delivery in a couple days, and maybe still in time for making them as CHRISTmas presents! The lady (Julie) was so nice and willing to help me out in a timely manner. This is a GREAT company! I sure hope this works with the new bag!
I am having this problem aswell 🙁
I purchased beeswax pellets at Michaels craft store, but it states for candle-making only.
Is it safe for these to touch food we will consume?
I personally wouldn’t use it. I’ve filtered raw beeswax straight from the hive and also used organic beeswax that I purchased at the same place linked to above. Either of those would be a better option in my opinion. 🙂
tried he wrap, but it was sticky .the pine rosin stayed clumped in areas.also left residue om the edge of the bowl. not sure how to spread more evenly, as to not get so sticky, pine rosin fron amazon $19.99
Hi,
I know it’s a bit late but maybe this answer can help someone.
Tree resin has a higher melting point than beeswax, around 100 to 120 °C. If it’s still clumpy you will need to increase the temperature of your oven. But be careful not to burn your wax.
Hope this helps!
I made these as Christmas gifts! I tweaked portions a bit, since they seemed very oily and over loaded with wax… probably has to do with thickness of fabric. Anyway, I reduced the amount of rosin and oil (also, I used melted coconut oil because I had it on hand) I used, and after the cooled I gave each cloth a good rubbing between the palms of my hands to smooth out any little bumps the rosin left. They seem much smoother and nicer after rubbing as opposed to just drying them and leaving them as is. Also, after a few days of drying the oiliness seems to diminish.
Hey there! I think there’s an error in the amount of jojoba oil for the 14 x 14 size–should be 1.5 tsps. (1/4 the amount of the beeswax and resin.) I made a bunch and they are not drying.
Just tried to make these by melting the wax, rosin, and oil together and spreading onto the fabric with a paintbrush, but it didn’t soak through before cooling and is a little too textured. Want to make them in the oven, but the largest oven tray I can find is only ~9 inches wide, so I could only make small ones. Any ideas what I could use instead, or where I could find a more square oven tray (in Australia)?
Thanks!
Hi Lisa, where did you find pine rosin in Australia? I’m also here and when I look for tree rosins find mostly myrrh or sandalwood rosin powders (for incense). Thanks!
So I did some searching, I’m in NZ and it appears that Damar gum is what we call tree resin over here? might be similar in oz? I do wonder if tea tree oil would work though and its easier to get!
We can get it on Trademe and from a website called shaman.co.nz which also does kits for making these. I would bet that Australia has a better range though if you search for Damar or wrap making kits, being that you are so much bigger.
Tea tree oil is toxic to ingest so it’s probably not a good idea to use it for these. You can make the wraps with just beeswax instead & add string & small buttons to wrap around a bowl or for other shapes.
I made these for Christmas 2016 presents and was also frustrated with the uneven results. After getting thick, and cracking areas of concentrated resin, I tried using a small sieve to shake the resin more evenly over the cloth, and that helped somewhat (but not entirely). I also tried evenly applying all three ingredients and then ironing between layers of baking parchment–did not result in uniform application, as there were areas of “blank” cloth. Back into oven, where vigorous brushing (even on the fabric edges that were sticking up vertical a half inch cos pan not quite wide enough) evened out the wax and jojoba–but would not budge the resin. I gifted the better ones, and will try using the rejects to see if they improve with use. LISA in AUSTRALIA: do you or someone you know have a large stoneware pizza stone? Don’t you have a cookie sheet larger than 9″? I put foil over a jelly roll pan that I didn’t want to get waxy, which was effective for protection but I think it may have slowed down the heat from below for melting grated wax on fabric. I really appreciate this post for the project, and both comments and author responses. Thanks.
tea tree oil i am thinking should work in place of tree rosin, which doesn’t seem to be available in New Zealand? it is anti microbial too. has anyone tried this? and maybe using coconut oil instead of jojoba? it is processed in NZ and easier to get to New Zealand in terms of air miles?
I wonder this too, please answer 🙂
Unfortunately tea tree oil lacks the stickiness needed and is not recommended for use with food.
I made these today! Thank you so much! But, mine are still super, super sticky — does this take hours, or days to get less sticky? I love the idea!!
Yes, they start out very tacky but mellow in a few days 🙂
I am wondering about how safe the pine rosin is as it comes in contact with food? I read every single comments and saw several other people had asked this, as well. Have you come across any information about this? Thanks!
That’s what I’m wondering too Bonnie – I’ve read that Pine Rosin can be an allergenic. It’s put me off purchasing some online until I know it’s 100% food safe. Does anyone have any information on this?
From what I’ve read, the rosin were also use in food industry such as bugglegum and also as coating in some pharmaceutical pill.
Unless an allergy to pine is present its fine.
Just wondering does the beeswax soak thru both sides of the fabric?
Yes 🙂
I am wondering about the pine rosin being food safe.
It is food safe. It’s from pine trees, in pine nuts (in pesto).
Do you melt the three ingredients together before sprinkling on to the cloth?
I was wondering the same thing?
Mix all the ingredients together first?
im afraid cutting the fabric will leave it frayed should i fold the fabric over a tiny bit and sew it or will cutting it with those special scissors fix that issue?
The pinking shears are used to limit fraying. You could definitely sew the edges instead.
I had the same issue mentioned by a couple people above about the pine rosin clumping. I’m going to put it through the Vitamix today and see if it helps. I’m hoping it’s okay for my Vitamix.
Well, just tried this but all I managed to do was burn them and set the fire alarms off almost deafening my poor baby who was asleep at the time… ?
I followed the recipe very strictly and after 24 hours airing my wraps are still very sticky and leave a thin sticky film on everything they touch! Is there any way to fix them or should I just bin them!
They will mellow out and become less sticky over the next week or so 🙂
My daughter uses this mix. I hope it helps.
1 cup beeswax in pieces.
2 TBSP’s of jojoba oil – helps keep the cloth malleable also seals better.
1/4 to 1/3 cup tree resin, is very sticky and waterproof as its derived from a resin.
To save effort add all to an old jar and put in a double boiler filled with water to melt.Lay the fabric on wax baking paper laid on oven trays and drizzle some of the mix onto the cloth and then place in the oven to re-melt and to allow the wax mix to spread over the cloth. She says to keep an eye on it as the Rosin is flammable.
Hi! I am planning to make these with a group of women. How much fabric did you use to make these sizes, 8×8, 11×11, and 14×14? Also, with the materials listed above, about how many wraps would you say you could make in total?
As I’ve read that beeswax wraps cannot be used to wrap meat because they cannot be washed with hot water, I wonder if there’s a no-heat way to disinfect these. Maybe a treatment with grapefruit seed extract or the like? I use this as a disinfectant instead of bleach, mostly when my dog has accidents 🙁 but also when I clean out our bird feeders. Maybe spraying them with a diluted solution and letting them dry would do the trick? The extract does have a bitter flavor which might transfer to the food, so some testing would be in order. But I wanted to throw out the idea to see what people think.
Hello, I live in Spain and struggling to get the powdered pine resin. I can get . the chunks but powdering it seems to be very difficult. Any tips?
At what temperature is the the oven set to when you heat these up?
I just made these and I love them. I didn’t read through all the comments so I don’t know if this was covered, but I thought I would chime in. The first couple I made came out really oily in spots and I tossed them. I figured if I poured just enough oil to cover the space I was using on the parchment paper first and spread it with the brush all over, and then put the fabric down, it covered more evenly. Also I used a fine small strainer and powdered the fabric with the resin gum, it came out perfect. Thank you so much for this recipe! I am going to make a ton and give them as birthday and Christmas gifts!
Sorry, I had to correct this, I poured just a little oil and spread it so it would lightly cover the space on the parchment paper!
Hello!
I have made some of these and when I use them the wax seems to crack. It goes white on the folds…. Has somebody had this experience? What am I doing wrong?
Have a great day!
Sources for rosin:
Why couldn’t one buy $3 cakes of rosin meant to use on violin, viola and cello bows? Comes in dark and light. http://www.musiciansfriend.com/orchestral-strings/daddario-natural-rosin
Or pick dried rosin off the trunk of a pine tree?
Of course you’d have to grate it.
My husband used to keep bees. A beekeeper supports bees in many ways so they have less infrastructure work to do and can devote more energy to gathering nectar. She provides the home, installs frames with wax foundation already made (bees would normally have to make and shape this wax), moves the hives around to where flowers are blooming, treats diseases and infestations, provides water and food if they are running low. She takes part of the honey and wax but it’s probably far less than the “extra” the bees were able to make because of the beekeeper’s support.
Hi I have made few of these and love them. I have noticed that some of mine have gone kind of white and powdery though. Has anyone else experienced this? I think it is the resin re-crystalizing but not sure why some do it and not others. If I reheat the wraps they are fine again but would love to know why it happens and if I can stop it happening. Maybe too much resin?
Thanks
Do you have the weight of ingredients used? Tablespoons and teaspoons are not as accurate, depends on the size of the rosin and the wax. I am making these next week. Since I have started cooking most everything by weight, volume measures drive me crazy! 🙂
Am I totally missing this info somewhere…how much fabric should I order to create 1 of each size as described here? Or how many wraps can I make from 1 yard of fabric? I’m actually wanting to make several sets–one for me, and a few for gifts. Just wondering how much fabric to order…
I purchased 1 yard of fabriv and was able to make several of all shapes and sizes.
Hi Heather,
Do you know if I can use the rosin paste that is used on violins. This is pine rosin too. If yes, would you receommend the same quantities, or adjust them?
TIA
Hey Heather, I know you don’t have time to always get back to each individual comment on a post from a few years back…but am just trying to figure up how many of these I can afford to make for Christmas gifts. If I am thinking this up correctly, a yard of fabric will yield 3 of these using the sizes in the instructions, correct? With only 3 inches to spare? And also…the link for the stainless steel baking sheet you use does not have a link to click on. I have been researching on purchasing one and would love to know what you use, as well as support your blog 🙂 Thank you!
I just made a batch of these. The wax was a bit unevenly distributed, so I layered all 10 or so wraps in a stack, rolled them up somewhat tightly and put them in a 200 degree oven for about 3 hours. When they came out the wax had dispersed evenly throughout! It worked wonderfully!
Just a tip
can you use a slow cooker with liner to melt the beeswax and resin and just brush on?
Can you use another oil as an alternative to jojoba? Jojoba is quite expensive where I live but I have sweet almond oil. Do you know if that would do the same.?
I made these today and I was having the same problem a few people from a few years ago mentioned, about a problem with the rosin powder not melting properly. I ordered the same rosin powder recommended in the recipe and tried using a double boiler and combined the oil, wax, and rosin and even after 30 mins the rosin was just a gooey paste at the bottom of my container. I ended up scooping the blob out and just making the wraps with the wax/oil/rosin that had melted and they turned out to be tacky enough and seal around containers well. So I guess I doesn’t take much rosin to give enough tack. But I would love to know if anyone has made these recently and figured out a way to get the powdered rosin to melt?
Also, my finished wraps smell like the rosin (which is not very appetizing)…I’m afraid that will affect the food I wrap in it. Anyone else had this problem? Thank you!
Hello, I am experimenting with these today. I find the pine resin leaves splotches on the fabric and makes it not look great. I experimented with not using the pine resin and the wraps look a ton prettier. Does anyone have any advice for the pine resin not leaving yellowish spots on the fabric?
– Beeswax heated to high can combust into fire. Those thinking of doing it in a microwave or on high heat: dont. It can melt very quickly & suddenly at low temperatures. – I question if powdered pine resin is safe & would only recommend getting it from a tree or an apothecary. – No wax grating or baking is necessarily needed: simply place fabric on a piece parchment paper more than twice size of fabric; you melt the wax etc. in a slow cooker; use a metal ladle to pour onto fabric; cover fabric with other half of parchment paper, and iron on low-ish heat.
I will say, if you are going to make the cute little foldable one at the top with the button, it pays to wax the string and wooden buttons too, for easier washing ?
What is the purpose of Jojoba oil and Pine Tree resin?
I just tried this! I feel like the pine resin was too heavy… I halved the quantity. Before, I would be stiff and brittle when the resin dried a bit, leaving big clumps and spots that would crack worse, and it would crack when bent. With half the quantity it was much more pliable. Even when I tried the full quantity of resin I diligently spread the mix around after it had melted to try to avoid the resin spots, but no dice. So… my advice if you still want the tackiness that the resin provides (like, it will stick better to bowls and itself if you have the resin) then use very little.
I’ve used the powdered resin and find it initially melts into one big gooey glob. I add the beeswax and the jojoba oil all at the same time, and leave it on the double boiler method stirring every 5 mins or so for about half an hour. (Keep an eye that the pan doesn’t boil dry). With a bit of patience all melt into one smooth liquid which can then be poured into moulds so you have a batch ready either for re-waxing or starting afresh. I used paper muffin cases in a muffin tray about half full, to end up with about 6 x 50g (2oz) blocks of ‘ready to use’ wax. I’m still tweaking the recipe but find about 60 resin to 40g beeswax and a couple of Tablespoons of jojoba seems to give a tacky result that sticks to itself better than equal quantities of resin and wax plus a Tbsp of oil.
Most helpful; weights much appreciated and making it ahead and molding it super idea.
***This is the first recipe I’ve seen more resin than beeswax and am wondering if that is a misprint or is this something new? Would really like to know before I start! Thank you so much,
I am wondering if you can hand wash the food wraps? I have tried but seem to be losing the wax when I do that.
Hi! I don’t get powder resin un my country I have rock rosin, how can I do? Melt in a pot and once cold gratting? Thais works? Tku!
Just crush it! In a mortar or in its bag with a pastry roll. It is very easy to crush.
I love this idea. I’ve been trying to find more environmental-friendly options for covers. Thanks for sharing this post.
Hi Heather, I’ve made your wax wraps a few times and given them as gifts although I’ve just been asked if jojoba oil might not be suitable for those with a nut allergy. Any ideas? And if so are there any alternatives?
they work fine without the jojoba oil and pine stuff if you do not have them.
Hi, I tried reading through comments but did not find an answer. when you place in oven and paintbrush the wax and oils on the fabric then heat up, do you repeat on the other side as well?
Thank you!
No, just one side 🙂
Hi, I had read an article that said pine rosin was not food safe. Have you researched the safety of this ingredient near edible items?
Yes I have and I am personally comfortable with using it. Just like with essential oils, there are people who say you can ingest as much as you want and some who say they are dangerous and should not be ingested at all. After researching for about nine months, my personal conclusion is that we should get most of our essential oil “intake” from foods, which contain tiny, safe amounts of them. However, I also believe there are times when the benefits of ingestion may outweigh the risks for a particular situation – in those cases, I recommend proceeding under the care of a qualified practitioner.
All that to say, there are a variety of opinions on the safety of many things, including water which can be toxic in large enough amounts. I encourage you to read and research until you find an approach you feel comfortable with.
By far the best tutorial online for the beeswax+resin+jojoba oil tutorial out there! Thank you!
If the button is sewn on, doesnt that le germs get into the cotton….
1. Inside the fabric,
2, in the cortton in the thread
surely its more hygenic not to piece it or use cotton and string on it?
I made these today and my wraps are very sticky and leave a residue on my hands when I handle them, even after leaving them to dry for a few hours. I am worried about them leaving residue in the food. Is there some way to make them less sticky?
They can sometimes take a few days to cure, or sometimes longer in high humidity environments.
Hi
my wraps are soft, not hard like Abego wraps. I’m using 100% light cotton.
What am i doing wrong here?
Regards
Doreen
Hi,
I’ve just tried this and have ended up with crusty stuff all over the top. I think it’s the resin. Any suggestions?
Thanks
mine did too, at first. I went over it with the iron (between parchment paper) and it fixed it.
My wraps are giving crack marks when i fold it can you please how can i avoid. I followed exactly your recipe
What a great resource on reusable food wraps, have taken a lot of inspiration from this post.
Can you make the wraps with 97% cotton spandex material?
I love this idea! I tried it with the iron method and, I don’t know, maybe I’m a cheapskate but they seemed really saturated so I used other ones to soak up the excess (or so I thought) beeswax. they just don’t work well. should it be dripping with melted wax when you let them cool?
Did you wash the fabric first/ The sizing off?
Yes I did 🙁 May be I need to add more resin?? Do you think?
Could you use wax paper instead of cotton fabric?
Unfortunately I don’t think the wax paper is sturdy enough, and it also isn’t able to absorb the wax and oils.
Hello,
I am preparing beeswax wraps for one of my school projects. We are planning to collect specific wastes from restaurants and coffee shops like a coffee waste, eggshells, orange peels, etc. My plan is to rather than using plastic bags to collect these bags, using cotton bags coated with beeswax, linseed oil, and pine resin. Because beeswax is also antibacterial it might be a good idea. However, I have some concerns. What are you thinking about collecting food waste ideas? Do you think it is not hygienic? Also, I don’t want these bags to be sticky that much. Do you have any suggestions about how to get rid of this stickiness?
I am so addicted to your website …. its so super cool … I was looking for this tutorial and BAMB!! here i am thanks for sharing.
Thank you for the great tutorial! I’m trying to reduce plastic in the kitchen and these wraps are a very good replacement for plastic clingfilm.
used powdered resin, baked the fabric and mixture for 45 minutes. The resin NEVER melted. I’m going back the brick of beeswax that already had the resin and oil mixed in.
Although I like this idea and am trying really hard to get away from plastics, I find that placing a plate on top of a bowl works great and also try to wrap foods in wax paper and a cloth napkin or tea towel. My MIL always used plates to cover her bowls and you can stack them in the fridge!
That’s a great idea, thanks Jody!
Honestly this is the best thing I’ve seen in ages!! I despise plastic wrap and I’m trying to get rid of as much plastic as possible anyway! This is super cool!!!
how can I buy the kit and how much is a kit or how can I buy bulk. I would like to make some wrappers. how do I know if the fabric is organic I have a lot of cotton material? I Have some old at least 9 years it doesn’t have any information on it so I don’t know if it organic either. Do you think can use the things I all ready? I am excited to get started making the wrappers.
I am super impressed with these beeswax wraps! I made the sizes listed and also some larger ones to wrap loaves of artisan sourdough bread in. They are wonderful and I plan to keep making them. They definitely start out a bit stiff but after the first use they are flexible and easier to use. Wish I’d made these sooner! Thanks for the method explained and the pictures, so easy to follow!
Where can I purchase the bees wax and pine resin, and can I use coconut oil in place of johoba oil.
To find the materials, click the blue links in the recipe box. I haven’t tested this project with coconut oil so I don’t know how it would work out. Jojoba oil is a much “drier” oil that coconut so it doesn’t leave a greasy finish, and that’s why I chose it for this wrap.
I am a beekeeper so I do not intend to buy pellets. It would be really nice if the weights in ounces or grams were added rather then just measurements in teaspoons or tablespoons. You may also want to remind people to not wash wax down the sink with hot water. It may solidify in their pipes and become a plumbing nightmare.
Where do you store them? I live in the desert and even inside the house things melt in summer. Can you store them folded up in the fridge? Can you store them folded up at all?
This is such a fantastic and eco-friendly project! I can’t wait to try making my own beeswax wraps. The step-by-step instructions are super clear, and I love the tips on choosing fabrics. Thanks for sharing this wonderful idea!