
So, imagine you’re having lunch with a wild Bactrian camel, as you do, and the subject turns to which one of you has the more impressive olfactory capabilities. The camel tells you that he can smell water from 50 miles away, and you’re like “Eh, that’s cool, but I can wave this little bottle under my nose and stop a bad mood in its tracks, improve my memory, trigger a burst of creativity, and support my immune system.”
In my book, you totally win. Unlike other senses which are processed through the thalamus, our sense of smell has a direct line of access to the cerebral cortex. With this knowledge we can incorporate essential oils into our lives in a way that enhances cognitive performance, memory, focus and creativity. One study found that rosemary oil can increase memory by up to 75%, while this study found that it can improve both speed and accuracy during cognitive tasks.
But really, that’s not the most impressive part. Smells are also deeply interconnected with our limbic system – the part of ourselves that connects, feels, experiences intuition, inspires and motivates. Essential oils can help to soothe and calm us, or invigorate us and lift our mood.
As you may know, I’m currently working toward my aromatherapy certification. One of the things I have learned along the way is that people often discount the inhalation method of using essential oils, but it is often the best (and most effective!) method.
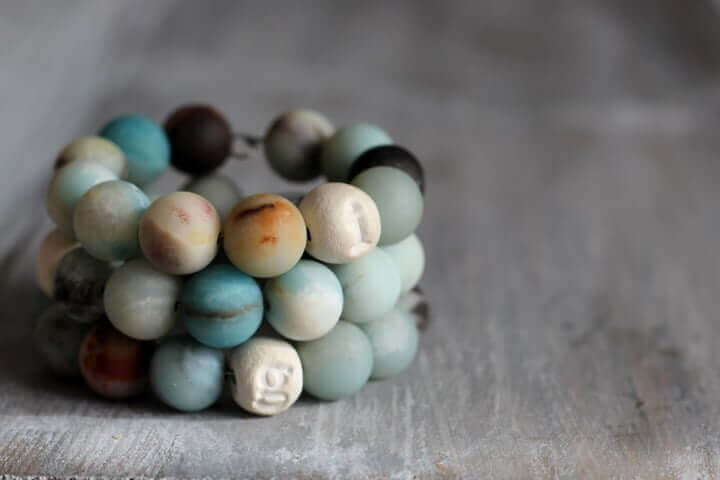
But before we get to that, here’ s a preview of a tutorial for aromatherapy bracelets that I’ll be posting soon. I’m so excited to share it with you!
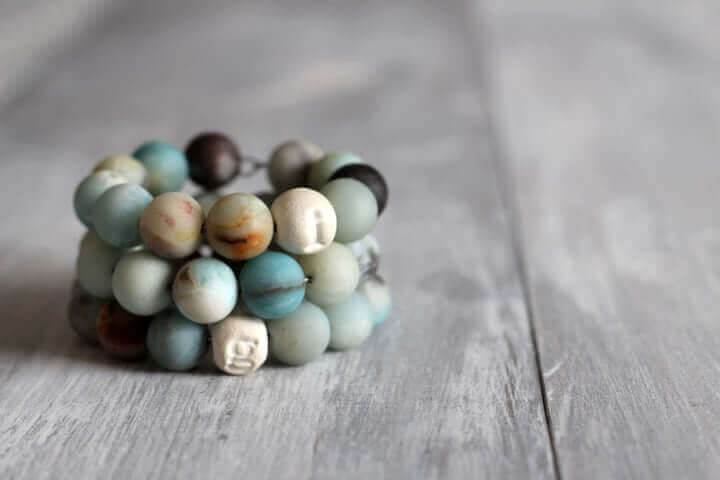
Update: The tutorial is now posted here.
So how do I use a diffuser necklace?
Great question. Just apply 1-3 drops to the top of your diffuser necklace – the part that doesn’t touch your clothes when you put it on – and you’re ready to go. Refresh as needed. Some oils have quite a bit of staying power and can last for several days, while others will fade more quickly.
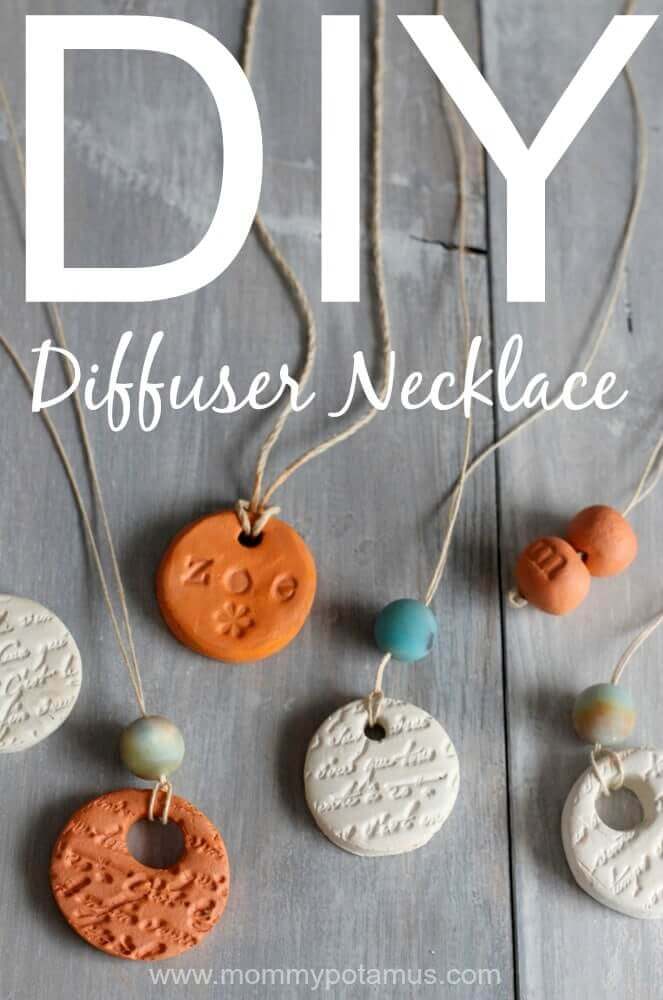
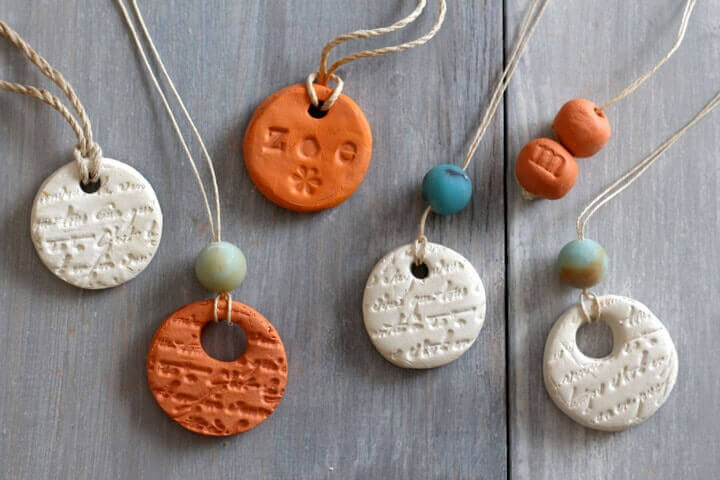
How To Make An Essential Oil Diffuser Necklace
Supplies
- Air dry clay in the color of your choice – Find terra cotta here and white clay here
- Lid, cap or cookie cutter in the size and shape you want your pendant to be (I used a vodka bottle cap that I’d purchased to make homemade vanilla extract)
- Straw or pen cap
- Cording (I used 10 lb cording for the necklaces with decorative beads, and thicker 48 lb cording for those without. You can find 10 lb here, or you can buy them as a set with a few other types here)
- Wax paper
- Decorative beads (Optional – I used these Amazonite stone beads in the 14mm size. They come in 15 inch strands, so I used the leftovers to make a few aromatherapy bracelets)
- Stamp (Optional, adds a bit of design. I used this stamp of old French writing to create mine.)
- Toothpicks or skewers (Optional, only needed if you are making beads)
- Fine grit sandpaper (Optional – Finished pieces have smoother edges with light sanding)
- Superglue (Optional)
Directions
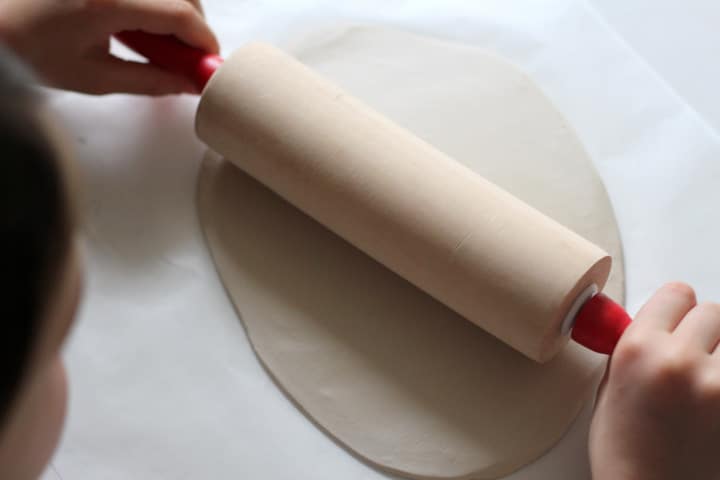
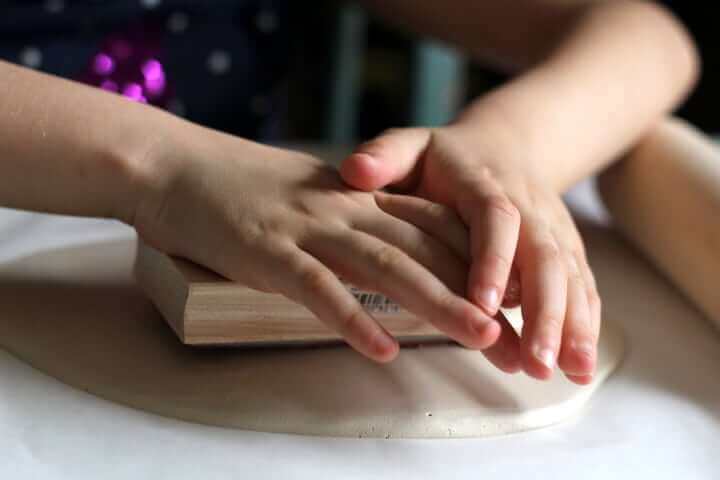
On a surface covered with wax paper, roll out your clay until it is about 1/4 inch thick.
If you notice air bubbles as you begin to roll, use a toothpick or wooden skewer to pop them and then continue on. Air bubbles are not a problem for air dry clay like they are with kiln-fired clay, but popping the air bubbles will result in a smoother surface to work with.
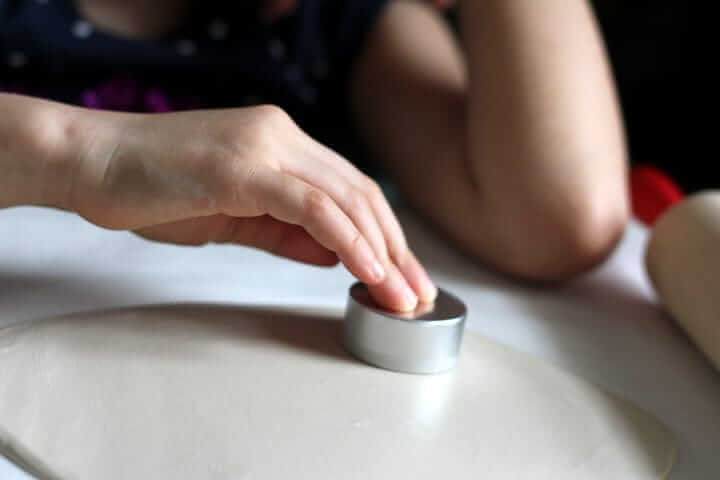
Press lid, cap or cookie cutter into the clay to create your pendant shape.
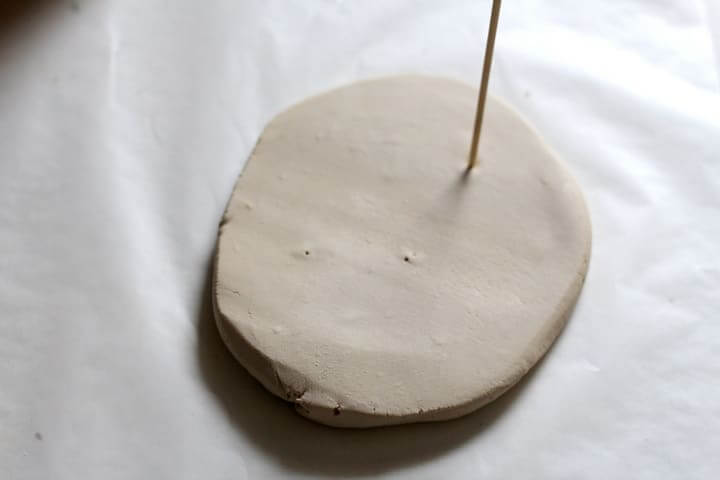
Now add the hole that you will string your pendant with. For the larger holes pictured above we used a Sharpie pen cap with the clip bent so that it was out of the way . . .
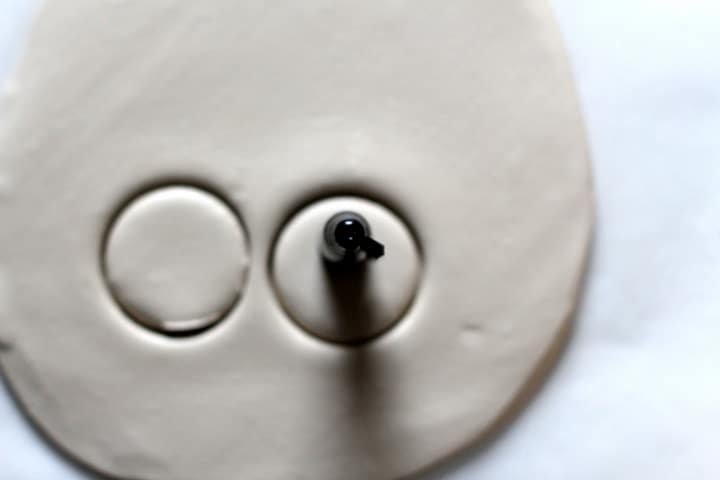
And for the smaller holes we used a straw . . .
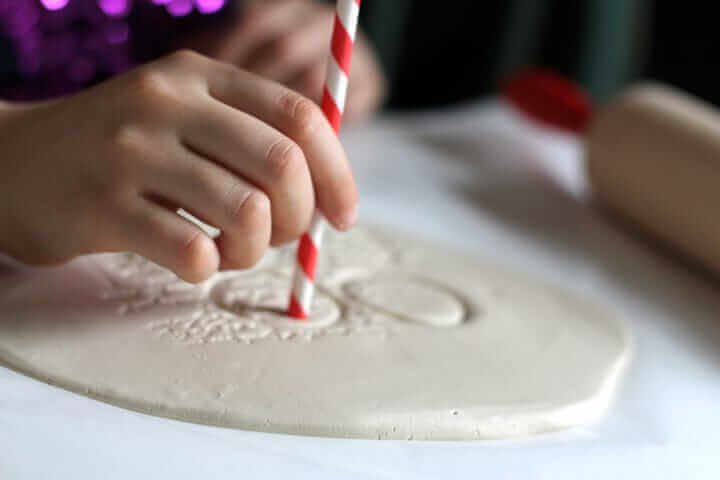
If you’re using a stamp to add design, now is the time to press it into the clay.
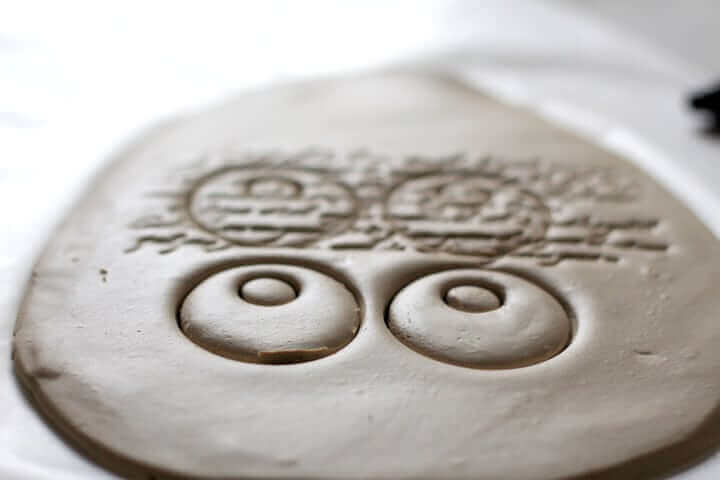
We did some with and some without.

Peel away the clay from your pendant and allow it to dry for 1-2 days.
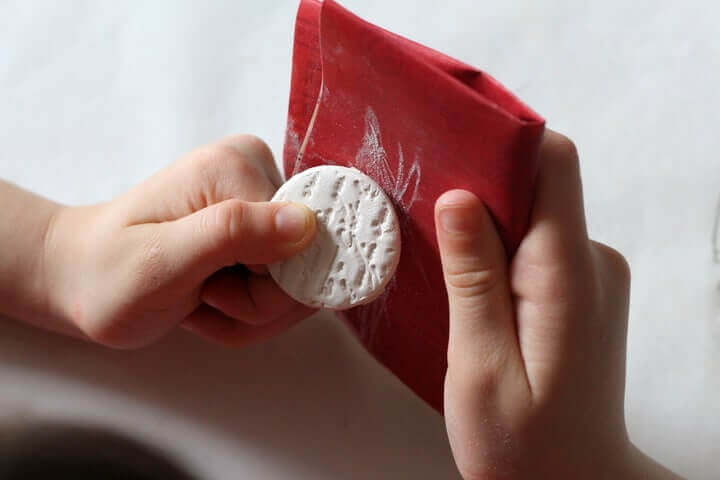
When the pendant is dry, lightly sand away any rough edges.
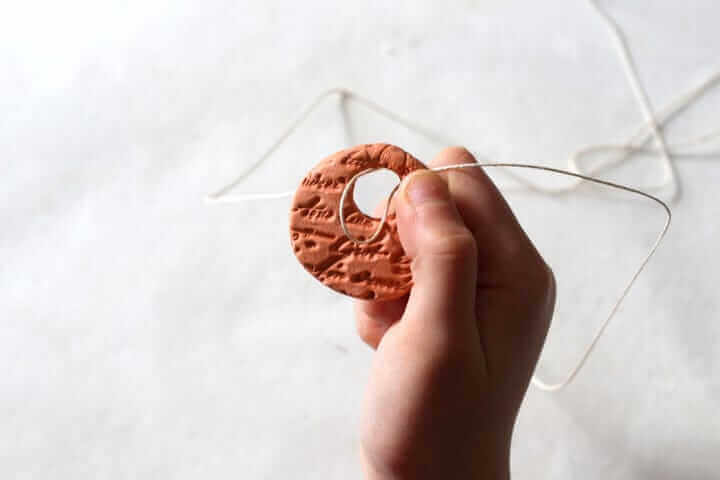
Now it’s time to string your pendant. Decide what length you want it to be – since it doesn’t have a clasp you’ll want to make sure it will fit over your head. After you trim the amount of cord you’ll need, fold it in half and slip the middle of the cord through the back of the hole in the pendant to the front. You now have a loop.
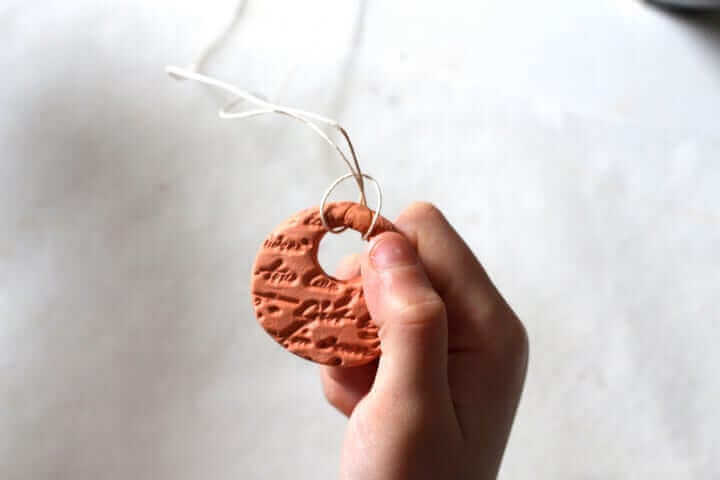
Then take the tail of the cord and slide it through the loop. Tighten as needed.
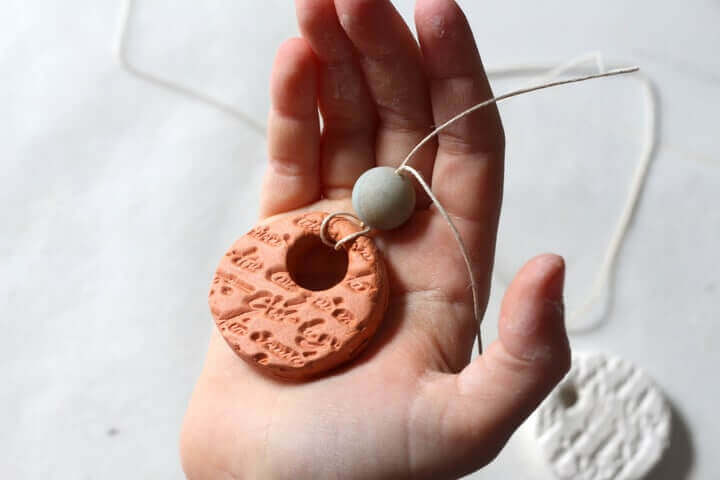
If desired, add a bead for decoration. Because the holes in my beads were so small it was very difficult to thread two pieces of cord through. I threaded the first cord, then added a thin layer of superglue to the tip of the second cord and allowed it to harden. Once it was stiff I was able to thread it through.
Care Instructions
Do not allow necklace to come into contact with water.

Do you drop the oil directly on the clay?
Yes, you do!
When it’s is wet or dry?
You can do it before or after, but you will have to do it after, too, if you want it to continue to smell good. I think…
Do you apply the oil to the clay when you are making it or once it has dried?
After it has dried. Apply 1-2 drops and refresh as needed 🙂
Doesn’t the oil get on your clothes?
Hi Susan, you put the drops on the top of the necklace – the part that doesn’t touch your clothes 🙂
My air dry clay pendent made stains on my shirt it was very dry but I found the Tera cotta colour did it, could I prevent this by baking? It seems like it need to be stronger they broke easy
Ok so these pendants are clay but not fired? Doesn’t that make them break easily? or is this a different type of clay then I am used to?
Right, they’re air dry instead of fired. They are more fragile than fired but I’ve had some of mine for years and they still work beautifully. 🙂
I would also like to respond to Joanne’s question which may also help other people. It’s been awhile since I made one, but thinking about doing it again. The one’s I made before, I always put some type of clear coating on the back of the clay. Maybe Heather can suggest what type of clear coating to use or go to your local craft shop.
I want to scent a whole room with this. Any suggestions? Also do you dilute the essential oil in carrier oil?
No
Thank you for the wonderful information 😀
At what stage do you add the oil?
After it’s dry
Do you use the same pendant for all the different oils or do you make a pendant for each oil you plan to use?
That would be a great idea make as many as you want use different oils for each one,also use different coloured cord to match oils white for vanilla,red for rose etc.
Can you change the oils or do you need to stick to one oil once you add it? How often do you need to reapply?
Also, does the white discolor once you add the oil?
Can’t wait to make these! 🙂
Anyone ever get a response to this question I can’t find an answer?
My necklace is white and hasn’t discolored using a very orange tangerine essential oil.
I reapply a couple drops once a day but could do more often. I lay it on a napkin and let it dry a little before putting it on. Haven’t changed oil types and think it is better not to. I plan to make more necklaces for different oils. Love wearing this necklace.
You can change it, but I would advise making several and using each for it’s own specific oil because the clay will absorb the scent some & the scent will change a bit.
will the oil come off the clay and get on your clothes?
No, it doesn’t. They clay absorbs the oil, but the aroma remains. I used one to aid my middle child’s ADHD & loved it so much that I was planning to purchase one for my other two, until someone stole his. I don’t want to spend that money again, just to have the same thing happen, so I think we’ll have a craft day & make them this time.
May I ask what oil you used for your child with ADHD?
Vetiver oil is good for adhd, also lavendar and cedar wood, but vetiver works great, smells a little bad though 🙁
Vetiver with peppermint has a pleasing aroma.
Your instructions don’t mention when to add the oils to the clay or how much. Do you add to wet clay or once dry? Will the oil in the pendant leave a residue on clothing?
How long do the oils last? And how about using difference oils each time?
So you can change what oils you use everyday? You put the oils on after it’s baked, right?
I haven’t used yet, but what I’ve been reading from other sites is you want to wait til the scent fades before adding different one
You do not (have) to wait…I put different oils on it as needed…but you can add or wait its ok
Are you adding the oil when the clay is dry or fresh?
I’ve read that the colorful clay starts to “bleed” on your clothes? Is that true?
Yes, mine started to disintegrate over a year. I switched to a lava stone in a pendant that acts like a cage. You can open it and switch out the stone for the desired smell of the moment. It works great and keeps the fragrance for days it seems.
At what point do you add the oil? Before or after it dries?
you put the oil on after it dries! 2-3 drops will do…I put the drops on one at a time and wait a minute in between so it absorbs. never had any problem with it staining. it put mine at the top and it generally doesn’t touch my clothing. after the smell dissapates and you don’t smell it anymore you can just add more drops of the same oil or change to another one.
I can’t even describe how awesome this is! I have to make these ASAP. What a wonderful idea.
These sound interesting but when I clicked the links for the clay you used, ark, the reviews were overwhelmingly negative.
Did you experience problems such as the items cracking, falling apart or the oils disintegrating them? I have limited funds and do not want to spend money on something that won’t work for the pendants I’d like make as gifts.
Dumb autocorrect! I have NO idea where the word ‘ark’ came from!
I’d like to make a few too but also have limited funds for clay that might crack or disintegrate. Next question,same as others,at what point are EOs added?
she stated above that the oils are added after it is dry and you can reapply as needed, you can also change the oils you use.
I made them, one tub of the clay makes many necklaces and beads. I have had no problem with them cracking. I think you want to be careful about the thickness and shape of the pendant. If you make them round and at least 1/4″ thick they are fine, if the are too thin or have points in the shape (I.e. stars) I can see how they would be prone to cracking and breakage.
Kathy,
my self, I think it would be better to kiln fire the discs. They would still be porous and absorb the oil, and not crack or break apart. I have bought Terra cotta oil diffusers and they were ALWAYS fired clay. Like clay pots. Raw bisque clay will eventually disintegrate each time it is wet or dampened.
LOVE THESE! Very excited to hear about the bracelets soon too. Who are you doing your aromatherapy training through? I’m interested in pursuing that as well.
This is an amazing idea. I might have missed something, though. Do you add the essential oils to the clay before or after rolling; before or after cutting; before or after stamping; before or after drying? How long does the scent last? 🙂 Thanks! So excited about this! Can’t wait to try!
AFTER the clay has dried, THEN add 1 to 2 drops of chosen oil
A LITTLE goes a LONG way. Let it sit flat for a minute or two to let oil soak in before putting it on to wear
At what step do you add the oil?
These are so cute! I have one and I love the look but I put three drops of oil on it and they smell was gone in 10 minutes. How long should it last? Is there a way to get it to last longer?
It is possible that the smell didn’t go away. ..you just became immune to it. Most people can’t smell their perfumes after they have had it on for awhile unless they take a concentrated sniff right where it was applied.
If you don’t use good quality oils they won’t last or smell as good.
I am not sure how long the oil lasts on the clay as I have just made some, but I made them out of Sculpy clay and baked it in the oven, got really hard…Now I am trying something new and using wooden disks…not sure if the oil will bleed through to clothing or not still experimenting with that. Has anyone made them out of wood?
Can you use sculpey clay and bake it?
I haven’t seen an answer for your questions, yet, so I’m going to try it, and see if it works. We’ll see if it works.
Yes, I made leaf pendants with clay molds for oil necklaces with Premo baked clay. One drop of oil runs down the leaf-lines and is absorbed enough after about 30 seconds to lift without dripping onto clothes, etc.
This was back at the end of last summer and my pendants look exactly as they did when coming out of the oven, no wear and tear or chipping on sides, etc., except shiny bits of slight oil residue on surface which is just pretty.
No Amy, you can’t use Sculpey. It is a polymer clay, therefore not porous. The oil will not absorb into it.
Yes, you can use Sculpey it works great. The oil absorbs well.
The clay i have drys over nite.
Is there a limit to how many drops of oil you can put on the pendant, how often can you add oil,do you have any suggested blends?
Can you use the same pendant for all oils or do you need a different pendant for each oil you use?
Hi! Do you add the oil to the clay before it dries or after?
Thanks! 🙂
have you tried this? How long does the effects of the EOs last on the necklace? Thinking of making a few for a friend. Would making them with actual kiln fired clay be better because of the more pourus surface?
where do you find the clay?
This seems like an awesome idea! I will have to try it soon!
This looks like a really fun and easy project. I can’t wait to start!
This is so fantastic! Love your blog, thanks so much for sharing! Just one question here. Can you use different oils? Will the clay retain the scent for a long time so that you always have to use the same oils? Or can you use a calming oil one day and an uplifting oil the following day?
What kind of paint did you use? Tempera? Watercolor? Acrylic? I have got to try these. Thank you so much for all your posts!
No paint
Wow, this is awesome. I can’t wait to give it a try. 🙂
I’m interested in getting an aromatherapy certification. Not sure who to trust though. Who are you going through?
thank you soooooo much I am so going to make these!!
Alie from the Netherlands
How much oil do you use at a time and are there any in particular you recommend for daily use? Like say, for a busy, tired Mommy??? 🙂
After it has dried. Apply 1-2 drops and refresh as needed 🙂
Can I use homemade clay? Limited funds:-)
Flour starch and water perhaps
If you search the archives here, Mommypotamus has an awesome salt dough recipe. I’m planning to give that a try and make these with salt dough instead of ordering another unnecessary product. Salt is cheap!
How do you get an aromatherapy certification??
BRILLIANT! ♡
Can you use a home oven to do the drying of the clay and I didn’t see your response on sculplyclay can you use that for your beads and circles?
How many necklaces can you make with the supplies listed?
I bought some supplies today and made them with my kids. So, to answer my own question for others here…the answer is, a LOT. I bought just the off-white clay and we made16 pendants plus some decent-sized figurines and I don’t think we even used half of the clay. 🙂
Hello, THANK YOU! Awesome tutorial!
Question… How did you get the beads to have those beautiful colors?
Hi Kristen, I bought them. They’re made from natural Amazonite stone, and you can find a link to where I found them in the “Supplies” section 🙂
A friend of mine has a kiln and does pottery professionally. If I used ceramic clay and fired it would it have the same effect as a diffuser? It would then become washable which seems like a good idea to me.
This was a super fun project and worked exactly as described! I used the air dry terra cotta clay, air dried for 2 days, then painted the back & sides with a thin layer of ModPodge to protect any chance of the color rubbing off on clothing, although I don’t believe it would anyways after completely drying. Just 1 drop of Lavender rubbed gently into the front has lasted 24 hours so far. I am so pleased with these I am glad I made extra to give to friends… They have loved them so far! Thank you for sharing!
Do I need to put a clear coat on the finished product to keep it from chipping or cracking?
Hi Kim, unfortunately a clear coat would prevent it from properly absorbing essential oils. It can break if handled roughly, but it is not prone to chipping in my experience.
What if you just put a clear coat on the back side (the part that touches the clothes or skin) that way the oil cannot penetrate through the other side if you accidentally put too much oil? Think that would work?
How do you keep them from breaking? I have had two breaks! Should the pennant get stronger or weaker when putting oils on them. I use young lining oils which are seed to seal oils no chemicals at all. Please comment! Thanks
LOVE this!!! I bought everything needed 🙂 However Im having such a hard time pulling the clay away from the circles AFTER I have done the stamps and holes. When I try to pull the outer clay away it pulls everything up and ruins it, so frustrating 🙁 It’s so sticky, any thoughts? Yours looks like it pulled away so easily. ?
Hmmm, maybe your clay is wetter than mine was. I bought two batches that were very different in consistency. You might want to set a little of it out to dry a bit and see if it’s easier to work with.
Thanks Heather!!! I used that terra-cotta one and yes, it was easier to use once it sat out a bit….I appreciate you replying so fast 🙂
try using a little corn starch on the clay and cutters to avoid sticking
Hi Heather!
My friend and I made these and they turned out super-cute! Thanks SO much for the idea. I can’t wait for a tutorial on the lava bead bracelet you have pictured!
Have a BeYOUtiful Day!
-Amanda
Hi! This are so cute!
i am going to try and make some! Do you think i could use polymer clay? Or do you think i should stick with terracotta? Thanks!
Can I buy a bracelet or two from you? Please. I am studying for an exam and the rosemary is exactly what I need. Plus, they are really pretty.
Thank you! My daughter and I made these today. They turned out so cute. I can’t wait for them to dry. We used these rubber stamps for a few of the smaller size ones and they were perfect.
https://www.amazon.com/Hero-Arts-Woodblock-Chinese-Wishes/dp/B002PNSVQA/ref=pd_cp_b_0
I love this! I can’t wait to make some. I was curious: where are you getting your aromatherapy certification from? Thanks!!
I have made these w/ the oven baked clay from Michaels and it’s not as effective and takes time for the oil sink it but it does after a while. I want to try this clay, but want to make sure it doesn’t come off on clothes? Thank you for your time and the instructions !!!
really excited to try it – Im going to make a MineCraft one for my son – to treat his stomache and anxiety issues!
So the terra cotta you used doesn’t come off or stain clothes?
It does stain while wet, but not after it dries fully.
Have you used paint on them and If so, what kind? I have seen some with painted accents and wasn’t sure what could be used with the oils.
can you use polymer clay that is baked but not coated?
Hi, I tried to make more of a tear drop shape and it still smells strongly of the clay and not so much of the EO. Is it because I didn’t make it into a disk? Do you know if I baked it if it would take the “clay” smell out? Thanks 🙂 (if I should bake do you know what temp and how long?). I used the white clay from Michaels.
Hi Kelly, if you used air dry clay you do not want to bake it. I haven’t used Michael’s brand clay so I can’t say for sure what might be going on, but it might be a good idea to let it dry for a few more days. The shape would not affect the scent.
Thank you Heather. I will give it a try again. Love your blog by the way! Thanks 🙂
Would this be acceptable for use on dogs. Like make a dog tag. Also what about a grommet for strength.
I have not studied essential oil use and animals much. I know that EO’s can be harmful to cats, and that there are also some that should not be used around dogs, but I don’t know more in terms of details. I would check with a holistic vet who is knowledgeable about EO’s.
Hi :).
Where do you get the letter stamps?
Thanks!
Any craft store will have them. There is really an amazing variety of stamps that you could use for this!
If you don’t mind, do you know of an essential oil book for a beginner? Thanks.
Check your local library. They have lots of books on aromatherapy and essential oils.
You can even use objects you already have to make impressions. Look through your jewelry box. Do you have a pendant you love that has a raised design? You can use all or part of the design. Just make sure you clean any body oils or perfumes, etc. from the pendant before you press it into the clay, so you don’t contaminate the clay.
Look around your house. Any hard item that has a raised design can potentially be a stamp.
I am dabbling with making my own oil blends for anxiety, and currently my blends are all mixed with almond oil and in rollers for use on my skin. I know it seems like this would be common sense, but just to be sure, if I switch to a clay diffuser, would I then no longer need to mix my essential oil blend with almond oil?
Autumn,
There are “cold” oils and “hot” oils, depending on the chemical make up. Hot oils can irritate the skin, which is why we use carrier oils such as almond oil. If you are putting them on the diffuser, no carrier oil is needed-as long as they don’t touch the skin. If you want to mix oils, I suggest you use recipes from an essential oil book. There is a lot to know about these oils. Some can build up in the liver and become toxic, some shouldn’t be used by pregnant women,etc.
Hi Sue…Do you know of any great essential oil books for beginners? Thanks.
Hi Stephanie,
I found this book …The Complete Book of Essential Oils & Aromatherapy by Valerie Ann Worwood….years ago, before I learned anything about the oils. It has so many amazing recipes and Valerie takes the guess workout, if you follow her directions. I used to get horrible sinus headaches, and then I came across her formula, using the rosemary, geranium and eucalyptus. (It also is good for coughs, stuffy noses, etc.) I make up the formula, drop some on a cotton ball and put it into a clean pill container and use it like an inhaler. Just remember -when putting anything on the skin (including using in a bath, because those oils float on top and go on the skin sames if you rubbed them on) always use a carrier oil and do a skin test ( when “mixing” oils together- you can create a totally NEW oil that might bother your skin) Also, most EOs are not food grade–so don’t use internally. (There are recipes in this book for food—if you want to make them–make sure you get FOOD GRADE oils) And if you put them on your skin- make sure they are 100% pure. Some companies add fillers, so you don’t know what you are really getting.
How did you get the clay to be colored? Is there a way to color the clay and still be able to apply oils? Obviously if you paint it, it’s no longer porous.
Stephanie, the clay can be purchased in two colors. I have linked to them in the instructions above. I have not found a suitable way to paint the clay other colors, unfortunately.
Watercolor paint seems like it should work and remain porous
I’ve bought several types of terricotta clay, air dry and oven, the clays do not absorb the oils. Earthenware clay is what is needed and you need to kiln fire it.
Amy is exactly right. Diffuser jewelry made from polymers aren’t porous and won’t work. Natural clay dug from the earth and fired in a kiln is what’s needed. It’s surprising how many DIY sites say that air-drying and oven-baking “clays” will work for these EO diffusing pendants. They won’t.
While agree that non-porous materials won’t work, I personally have had great results with air dry clay 🙂
Hmmmm, then I am confused because we have used terracotta clay (oven baked) for a couple years and they are very porous and hold the oils for a long time. A friend of mine has used the same necklace for two years and we made it for her. She loves how it holds the oils for so long. We are very happy with ours and don’t have access to a kiln so that isn’t an option for us.
I have made these Aromatherapy pendants out of Sculpey polymer clay and had no problems. The oil soaks right in. I’m confused now.
What about putting a coat of clear nail polish on the back, just to protect skin and clothes from direct contact?
You need a least one side with no paint or polish so that the oils can still be absorbed by the clay.
Bought everything to make these, but am curious how to put a clasp on or what/how you put the necklace on? I have never make a necklace w/ hemp string before & didn’t know if you just made it long enough to tie it in a bow or something? Thank you! Can’t wait to make a few!
Use one of your regular beads to make a clasp. Make sure you add an extra 4-5 inches of hemp, so you allow for tieing knots. Tie a knot, about 2-3″ down from the end on one side of your stringing material. String the bead on, and tie another knot to secure it. On other side of string, tie a loop that will slip over the bead. I like to make this a slip knot, (make a loop and overhand tie the knot). Trim any long ends near the knot. It helps to add a dot of glue to each knot, and allow it to dry before wearing, to prevent the knot from unraveling. I do this BEFORE I trim the ends.
Thanks for this article. It was a reminder of ceramic pendants I have made in the past and will create some new ones.
I saw this in time to make some with my daughters. One has been kind of anxious at the end of the day and has a camp out coming up. She was so excited to make one with her favorite oil, Serenity, as well as another with Lavender.
I love this idea!! Thanks for sharing it.
By the way, if you want to color the white air dry clay to any preferred color, mix small amounts of water-based paints, oil paints, acrylic paint (artist’s quality), pastel chalks or poster paints with the clay before modeling. Food-grade colorants can be used too; you can try cake coloring in paste or gel forms (but =not= the liquid kind you find in the grocery store!). Always test a small piece of white clay first, to determine how the color will work and to get the shade you’re after. Just knead the color through the clay after you have softened it up a bit. Start with a small bit and work it in. Add more if you want a darker shade.
Would food coloring work to change the colors? Rit dye?
It says don’t get the clay wet but the Ike are ok to put in it? Want to make sure before I make some 🙂
Oils*
Yes, essential oils are okay!
Hi! I love these necklaces but have a few questions. If you are wearing the necklace against clothing, will the air dry clay make marks or leave a stain, especially if it absorbs humidity or you get caught in the rain? And if you can sand the edges, will the clay wear off onto clothing, etc?
If it is dry it will not make marks while worn. If water is applied to it directly it most likely will. The clay does not wear off onto clothing after sanding as long as it is dry – hope that helps!
Heather, I was wondering if the OILS will stain clothing?
How easy do these break? I made some with crayola terra cotta and they break pretty easy.
I would like to be able to PIN your directions on how to make your diffuser necklace and bracelet although I am getting the message that ‘it is not in valid format’… I have never seen this before…can you help? Love this idea and your directions are awesome!
I got the same message, and was unable to PIN it as well.
Ok…Heather…I got it…Not sure what happened, but was able to PIN it on another location. Thank you for sharing! Anxious to try these!
Is it possible to make these with polymer clay? I sculpt with that and as you know, have to bake it. But would the essential oils work on baked clay?
I would suggest doing these with a baked clay such as terra cotta!
I’ve tried air-dry and no bake terra cotta. They look beautiful after making but as soon as you put oils on, within 4-5 days, they start disintegrating and turn powdery white. Trying to find a porus bake clay. Sculpey bake is not porus, oils sit on top. Help!!!
Sculpey is porous, which is why those who make ear jewelry from Sculpey tell you only to wear it in fully healed piercings, and why it isn’t suggested to be used for making eating utensils or vessels. It’s very porous when cured, so it should absorb oils easily if done properly, and as a bonus, it’s certified non-toxic and phalate free.
How is it done properly for them to diffuse essential oils? I would like to use the Sculpey clay.
I have no problems with Sculpey Clay. It is very porous.
Has anyone found that essential oils break down the terracotta any?
Can’t wait to try these!
I saw this clay in 3 other colors at Walmart!! A coral color, pale yellow, and green or blue!
I tried this, but when I put the oil on the clay (it was completely hard) it broke down the clay as others have already mentioned. I bought all the supplies, but very disappointed in the results. If anyone knows what clay to use that won’t break down once you put oils on it, that would be great! Thanks!
You could use sculpey bead clay, it comes in pretty colors and is non-toxic!
Such a wonderful idea! I have many small oil diffusers that I can bring them to anywhere I want. But these oil diffuser necklaces are far far better than that! Plus, they looks extremely beautiful. This idea is so impressive, I totally love it! Thank you so much for sharing!
So what’s the verdict on the best clay to use?
If I am reading this right,roll out clay, cut, stamp, let air dry for two days, string to make necklace. Put oil on stamped side away from skin. The oil soaks through the clay into the skin. So does the oils get on your clothing?
I bought two different kinds of clay to try. Both air dry, natural white, clay that you can do pottery with if you wanted. I don’t want to start unless I know I have the right things.
Would a diy clay like a salt dough work?
can you use the same beads/necklace and change out the different oils each day or should there be a necklace dedicated to only one oil? cant wait to make some of these!
You should have one necklace dedicated to each oil.
Such a wonderful idea! I have many small oil diffusers that I can bring them to anywhere I want. But these oil diffuser necklaces are far far better than that! Plus, they looks extremely beautiful.
Do you know the benefits of eucalyptus essential oil?
Good for respiratory and breathing! Plus smells great, although quite expensive it’s worth it!?
I have a kiln and I am wondering if I wanted to bake the terra cotta clay, how long and at what temperature. I use my jewelry kiln for making fine silver and bronze pendants, but have never worked with terra cotta clay. Also, how long does the essential oil last on the necklace? A few days, forever?
Thank you for any information
Trish
I haven’t tried baking it so I can’t say, unfortunately. Regarding how long each EO lasts, it really depends on the EO. 🙂
It depends on the type of terra cotta clay. I got one from India and that has to be baked in a kiln. But my sister warned me never to bake air dry clay for it already has chemicals added to it to make it stable. The chemicals don’t do good with baking.
How important is it that the essential oils you use are therapeutic grade?
Right now, I only have essential oils from the brand NOW, because that”s all that’s available, and am wondering if you would “approve” of them.
I have a few friends that are very educated in EO. They recommend that brand *NOW* over some of the other bigger companies that most people would order from 😛
For the people who say theirs fell apart, I wonder what level of oils they were using. Are the oils purchased from a big box store, or from a reputable company? I would like to try this as well and am hoping I have the 2-year success story like I read above 🙂
Do you make any leather essential oil diffuser bracelets?
You are awesome! I love your writing, ideas and even the website! It’s all so awesome. I come here for great did ideas and recommend to everyone!?
I ment to say ” great DIY ideas” not “great did ideas”. Stupid auto correct! ☺️
Hi, I have made these but they fall apart after a month or so of use. What am I doing wrong?
Hi Camille, I’ve never had that happen so I can’t help you troubleshoot based on my experience, but I have a few ideas. Do you live in a humid environment? What kind of clay did you use?
Thinking about making these to sell at an event….have you ever sold them? If so, what’s reasonable?
so many comments! I may have missed this, but use similar very successfully in the car / dog carrier!
I purchased an air dry clay necklace. I have only used it for two days, but all I can smell is the clay. Does the clay lose it’s smell over time, so that it doesn’t overpower the EO?
Thanks!
Hi Heather
Can I use eye shadows to color my white clay and do I color it before or after it is dried?
Thank you ☺️
Has anyone made these and have them really work for a long time? The oils will eventually break down the clay so if you want to sell them you need to inform people.
Does anybody knows if crayola air dry clay could be baked instead?I made some pendants for my kids,about 1/4 ” thickness ,and it never dried.Even after months it would crumble and still stain may hands.I plan on trying again as I still have a lot left,and bake them at 170 for a bit.
Is it necessary to use air dry or terra cotta clay? Will it work with polymer clay too?
Hello!
What color do you paint with sandpaper after you scratch it?
Hi Heather ! I have made some of these and absolutely love them ! I would love to sell them on my Etsy but am worried about the necklace not being able to get wet. Do you have any ideas about how to waterproof them without masking the scent of the essential oils . Thank you for any info !
What stamp did you use to make the one that says “Zoe”? Is there any particular kind you’d recommend? Thank you!
I used some rubber letter stamps that I bought at a local craft store.
Silly question, since I trust and appreciate Mommypotamus, but … Is this clay from Crayola safe? What’s in it, do you know?
These would be fun to make for my family for the holidays, but I’m curious what’s in this clay, or if you have other suggestions for this project if your unsure?
Thank you so much!
Hi! Is there another site to buy the clays? Amazon does ship overseas but the shipping price is really expensive! Do you know somewhere else to buy it?
I don’t know of any, but you might check with a local craft store to see if they carry it.
Oh wow! I will make this to ward off mosquitos. They do not like lavender, rosemary, nor eucalyptus. Also if you have adrenal fatigue, use cloves and rosemary. And if you want to rid your home of flying insects, spiders, roaches, crawling varmints, etc., use eucalypts, lemon and peppermint.
Thank you so much!!! Take care…
hi Heather
I love your content!
my question is… due to a traumatic injury to my face years ago shrapnel passed through my cortex area and destroyed my sense of smell/taste.
it’s been an interesting journey
I have been committed to learning how to best manage my pain anxiety etc naturally. and I’d love to utilize aromatherapy… but is it even possi le with my injury.
I do smell things now but its random and rarely correct good smells register as putrid sometimes & vice versa.. taste is mostly memory or texture related.
any advice would be appreciated.
janette
This sounds like a great project to do with great grandkids. I have something similar, but made from thin slices of a grapevine root. It’s a little over an inch in diameter and about a 1/4″ thick. It works great for adding oils too. Used about the same sized cord for wearing it. And thank you Becca for the oil recommendations for a child that has ADHD.
how cute!
LOVE IT!!!!!
I’ve seen other types of these before, but curious to know how long will these last after they have dried. As to not getting them wet, what can be done to protect them and allow it to be porous? Thank you.
I was wondering when do you colour the clay and is there a specific type of paint etc that you would use? I love the idea. I have had diffuser bracelets previously. Thank you I love all your stuff. I read a lot of it every day.
The clay is naturally tinted. I didn’t add anything to it. 🙂
Will regular air dry clay work as a diffuser, I do not have terra-cotta clay