
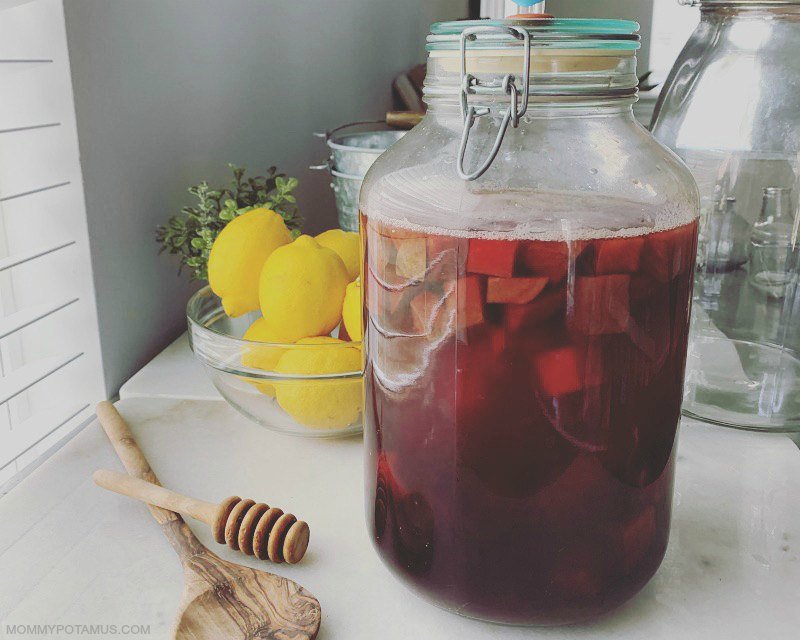
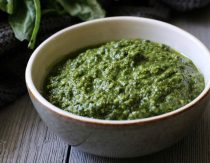
I love beets like I love email spam. Which is to say I don’t. There are some exceptions, though – I adore the salty, crunchy goodness of these rosemary beet chips, and at least a few times a year I crave the unmistakable, earthy tang of this beet kvass recipe.
Ruby red and rich in gut-friendly probiotics, beet kvass has long been revered in Russia as a blood tonic, liver cleanser and digestive aid. It’s usually made from rye, but can also be made from cherries, lemons, and perhaps most nourishing of all – beets.
Kvass is so woven into Russian folklore that it makes an appearance in War and Peace, where “Tolstoy describes how Russian soldiers took a ladle full of kvass before venturing from their barracks onto the Moscow streets during a cholera epidemic.” (1)
Why is kvass so revered? Let’s take a closer look . . .
Health Benefits of Beet Kvass
Beets are a good source of folate, vitamin C, potassium, magnesium, iron, manganese and phytonutrients such as betains, which have been “shown to provide antioxidant, anti-inflammatory, and detoxification support.” (2)
Research suggests that they:
- have positive effects on blood pressure (3)
- support a healthy immune system (4)
- have protective effects on the liver (5)
- support the ability of your body to replenish oxygen during exercise (6)
But of course, those are just the details on plain ole beets. While cooking them damages vitamin C and some other beneficial components, making them into kvass via fermentation makes many nutrients more bioavailable . . . and even adds some additional ones! (7)
And of course fermentation introduces beneficial bacteria, which further improve the nutrient profile by producing B-vitamins. (8)
Like sauerkraut, ginger ale, or kimchi, beet kvass rich in gut-friendly probiotics thanks to the process of lacto-fermentation. Basically, that’s when beneficial bacteria (lacto is for lactobacillus) are used to extend the shelf life (aka preserve) of veggies and herbs by inhibiting the growth of harmful bacteria.
The process works like this:
Veggies + Clean Glass Jar + Salt Water = Fermentation Magic
Here’s why: Lactobacillus are tolerant to salt while the bad guys can’t take much of it, so when we put veggies, salt, and water in a jar, the beneficial bacteria that naturally occur in veggies consume some of the carbs and convert them to lactic acid.
Lactic acid is what gives fermented foods their delicious tangy flavor, and because it also inhibits other organisms it’s one of the primary methods people have used to preserve food for generations.
As a bonus, fermenting increases the nutritional profile of foods by increasing the enzyme content and breaking down digestion inhibitors (oxalates and phytates) so that nutrients are more bioavailable. (1)
And of course fermentation introduces beneficial bacteria, which further improve the nutrient profile by producing B-vitamins. (8)
Now, you may be thinking, “That all sounds great, but . . .”
So, what does it taste like?
Good question! If you’ve tried kvass before, you may have noticed that it can be very salty – this one isn’t.
Since most of us are pretty new to fermentation, we tend to use a lot of salt to keep unwanted microbes at bay while the beneficial bacteria gets established. This approach can make some ferments very unappetizing, and I avoided kvass for years for this reason.
Fortunately, a book I picked up a couple of years ago, Fermented, uses less salt than other recipes . . . only 1/2- 1 teaspoon per quart. Seeing a lower salt ratio recommended by a fermentation expert gave me the courage to begin experimenting with lower ratios as well, and my batches have turned out beautifully – tangy and robust without being too salty.
Part of the reason for my success may be that I use a fermenting jar with an airlock, which helps protect the kvass from mold and yeast from the environment. However, I have friends that ferment with tightly closed jars and get good results, too.
This version is infused with ginger, which adds a pleasant flavor and also supports digestion. Feel free to experiment with other flavorings like citrus peels, bits of dried pineapple – whatever you like!
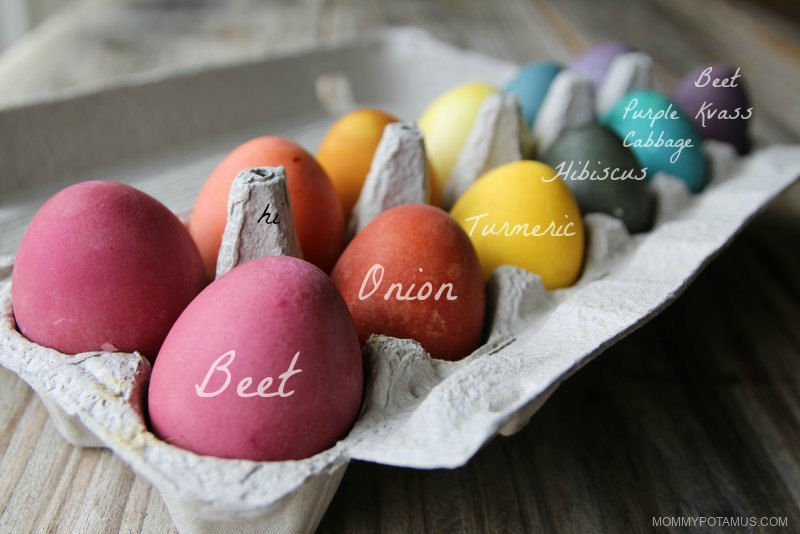
Oh and quick tip: If you’re ever inspired to dye Easter eggs, kvass creates a gorgeous purple color . . .
Ginger Beet Kvass Recipe
Equipment
- 1½ quart jar with airlock OR a 1½ quart jar with tight fitting lid
- wooden or plastic spoon
Ingredients
- 2 cups beets (rinsed and roughly chopped – no need to peel)
- 2 tbsp fresh ginger (rinsed and roughly chopped – again, no need to peel. see what I mean about how easy this is?)
- 4 cups filtered or spring water (chlorinated tap water inhibits fermentation)
- 2 tsp unrefined sea salt
Instructions
- Thoroughly wash and dry your jar and lid before getting started. If you don't have a jar with an airlock, see the notes section for using a regular jar.
- Place beets, ginger salt and water in jar. Stir with a wooden/plastic spoon until the salt is dissolved.
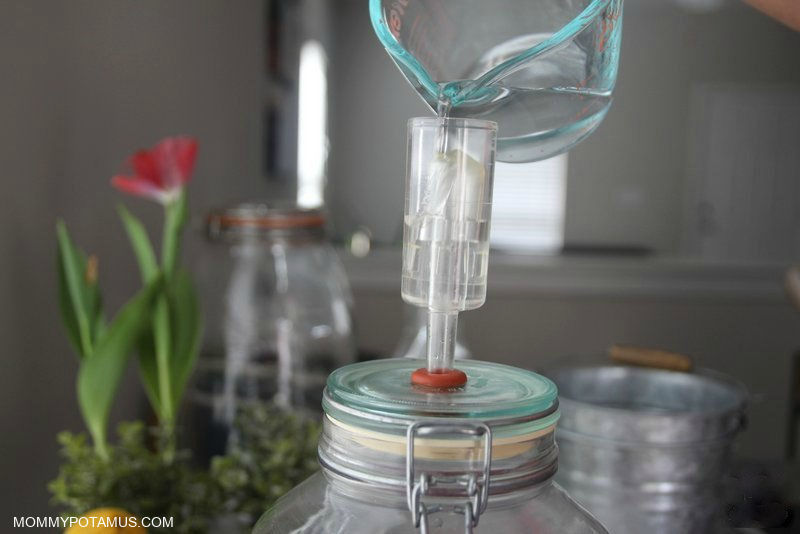
- Close the jar and attach the airlock. Add water to seal it. (If you’re new to airlocks, I’ve included a tutorial below.)
- Ferment at room temperature in a dark area. I usually place mine in a cabinet or wrap it in a towel.
- Allow the kvass to ferment for 3 days – two weeks. If I’m not in a rush I ferment mine for two weeks.
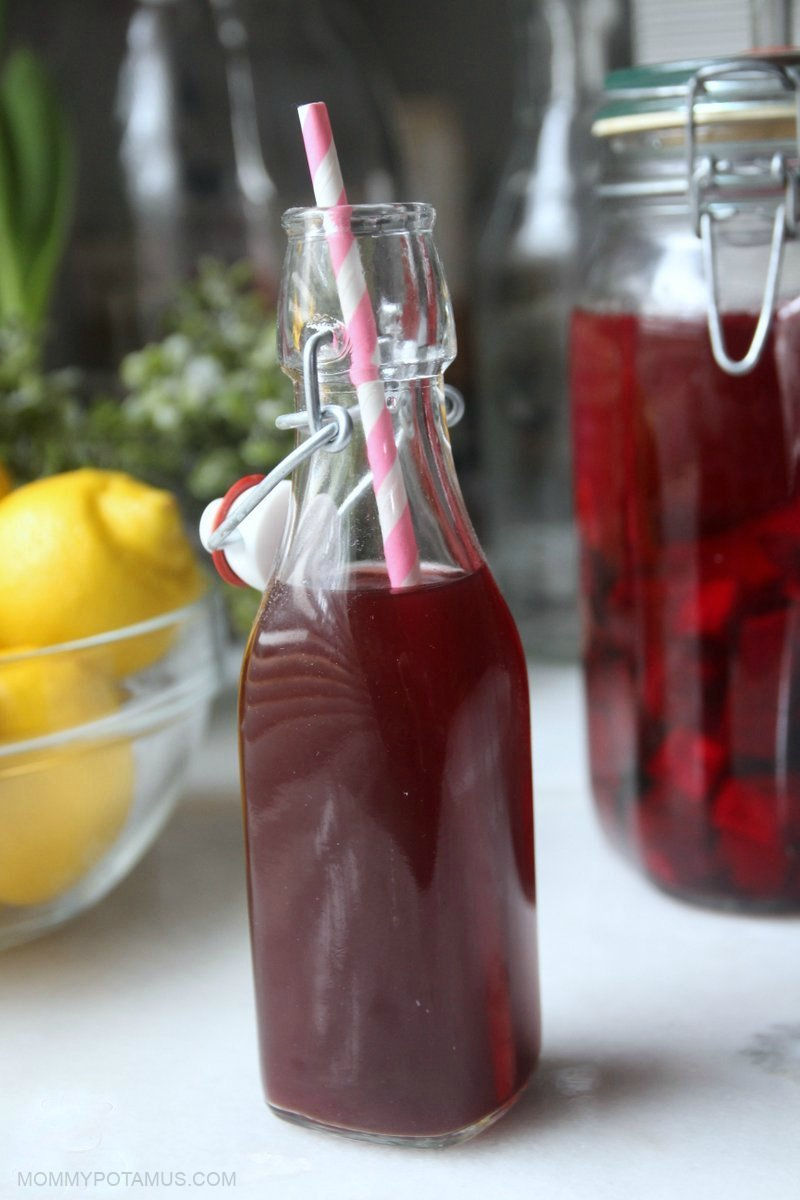
- When the kvass is ready, strain the beets and set them aside. Pour the liquid into a clean jar with a tight fitting lid or swing top bottles and refrigerate until you're ready to use it.
Notes
Nutrition
How To Set Up An Airlock
When I first starting fermenting, any mention of using an airlock immediately took my mind to space shuttles and astronaut suits. I thought it sounded way too complicated, but it’s actually super simple. Though the mechanisms vary slightly, here’s how I use mine.
Fill your jar with kvass ingredients, then using a twisting motion, push the main airlock piece into the top of the jar . . .
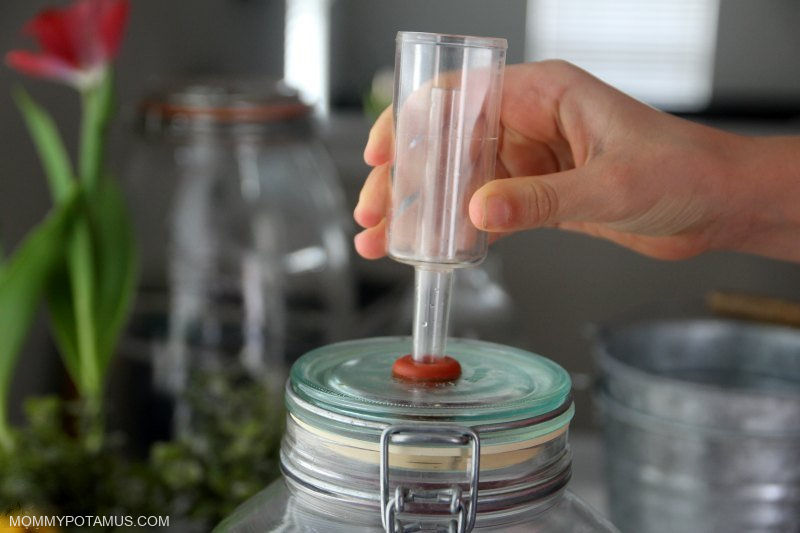
Add in the middle piece . . .
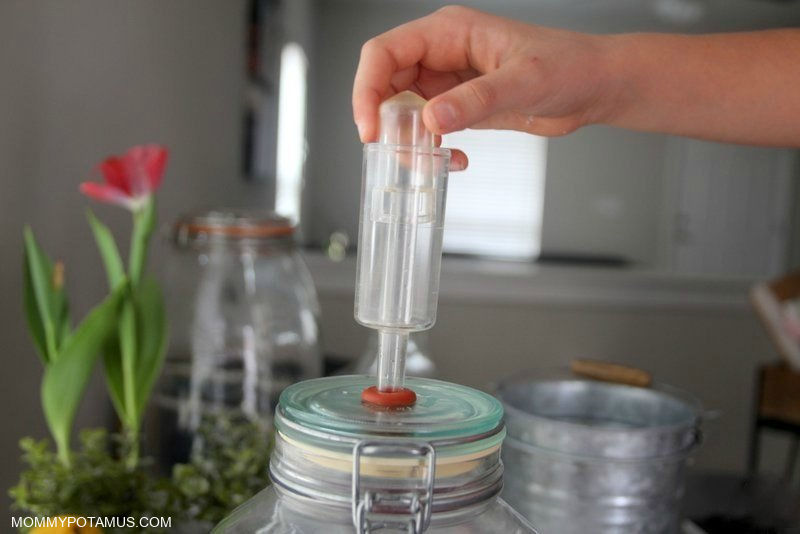
And then pour in enough water to bring the middle piece to the top of the airlock.
You will notice that the middle piece floats like a buoy at this point. I’ll explain more about why that’s important in the next section.
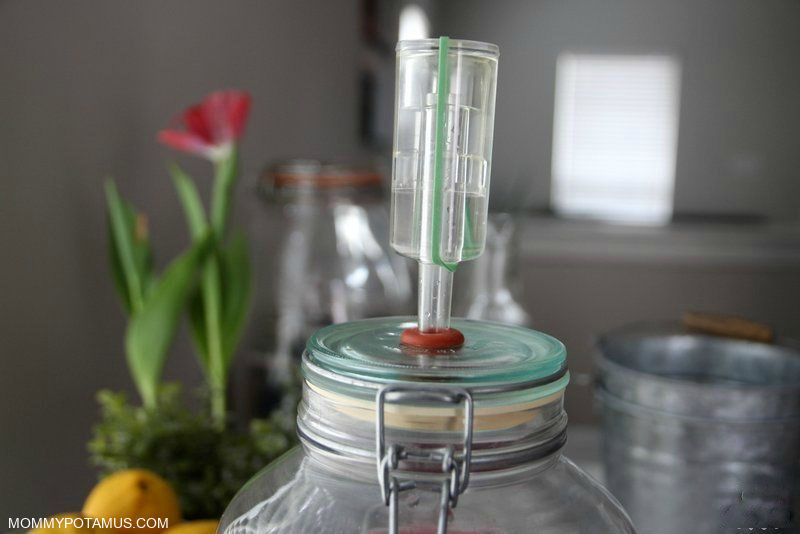
The last step to setting up your airlock is to place the lid on top. When excess pressure comes up through the stem (base) of the airlock, it builds under the buoy, which eventually bobs a little and allows the pressure to release through the lid, which has holes in it. All of this is done while the water seal stays intact, which prevents outside bacteria and yeast from reaching the ferment.
I, uh, lost my lid, so I secure the buoy in place with a rubber band.
Depending on how long you ferment you may need to add additional water to compensate for evaporation, but overall it’s very easy.
Want more research-backed natural remedies?
No problem, I’ve created a free ebook for you – Kitchen Apothecary: 25+ Natural Remedies Using Ingredients From Your Pantry – as a gift for signing up for my newsletter. You’ll also get updates when I post about safe essential oils for pregnant/breastfeeding mamas, exclusive gifts and coupons (I was able to give away a jar of free coconut oil to anyone who wanted it recently!), plus other goodies.
Sign up using the form below.
Sources
- The Weston A. Price Foundation. Kvass and Kombucha: Gifts From Russia
- The World’s Healthiest Foods. Beets
- Webb, AJ et. al. Acute blood pressure lowering, vasoprotective, and antiplatelet properties of dietary nitrate via bioconversion to nitrite
- Prahoveanu, E. et. al. Prophylactic effect of a Beta vulgaris extract on experimental influenza infection in mice
- Krajka-Kuzniak V et. al. Beetroot juice protects against N-nitrosodiethylamine-induced liver injury in rats
- Breese, BC et. al. Beetroot juice supplementation speeds O2 uptake kinetics and improves exercise tolerance during severe-intensity exercise initiated from an elevated metabolic rate
- Lu, X et. al. Radioprotective activity of betalains from red beets in mice exposed to gamma irradiation
- Hotz, Christine et. al. Traditional Food-Processing and Preparation Practices to Enhance the Bioavailability of Micronutrients in Plant-Based Diets
- Liem, IT et. al. Production of vitamin B-12 in tempeh, a fermented soybean food

After making, how do you drink / use it? How long does this keep — storage?
I drink about 1/2 cup in the morning and 1/2 cup in the evening. Fermented foods typically last a very long time in the fridge – some say months, some say years. 🙂
Quick note: If you’re new to kvass it’s best to start with less and work your way up – too much too soon can cause gassiness. 🙂
I’m an older woman and I use mine every morning to take my pills. I find that the ginger makes a nice change to the flavor abd I’m going to try adding citrus peel to my next batch.
Kvass is super easy to make and I’ve had great success with it. (I also add some unflavored carbinated water to my daily glass if I used more beets than usual to the batch and the kvass came out a bit thick.)
Wondering same question about storage and how much do you drink at one time/day?
Hi : My kavass is now in day two of fermentation however I do not see any bubbles just yet only a light ring of thin bubbly froth around the edge
Of the liquid at the top. I did not use ginger cause I didn’t have any on hand . I also used pink Himalayan salt again what was available at the time and my bottle is a regular tight closed jar . I am wondering if I have gone wrong . Thank you Heather foe sharing so very much .
What is the best time to take this drink for maximum benefit? Empty stomach? Just before meal or after meal? TIA.
When I have a batch available I typically drink 1/2 cup in the morning on an empty stomach and then another 1/2 cup while I’m eating dinner. I’m not sure which is the best approach, it’s just what works best with my routine. Quick note, though: If you’re new to kvass it’s best to start with less and work your way up. (It can cause gas.)
Thanks for the reply, Heather.
Is it supposed to look kind of scummy on the top (after 3-5days)?
I’m curious about the variation in fermentation time. Do you prefer the longer time (2 weeks) because of the taste, or for more probiotics to be in there, or some other reason? I’m interested in trying to make a batch, but I know I’ll be eager to try it and won’t want to wait 2 weeks! Just wondering what’s different between a 3-day batch and a 2-week batch (or a 1-week batch, etc).
It improves the probiotic benefits and tastes better, at least in my opinion. I have been known to ladel out a glass or two a few days in because it’s hard for me to wait, too. 🙂
I’ve been stirring and stirring but the beets and ginger aren’t dissolving.
Oh my, it looks like there were a few words missing in the instructions. You’re just supposed to stir until the salt is dissolved.
Oh, that’s way easier. Thanks.
BWAHAHAHAHAHAHAHAHAHAHAHAHAHAHAHAHA!
Does all fermented food cause gassiness. My young daughter has gastrointestinal bloating problems. Doctors don’t know why. We have done the low fod map, paleo, gluten free, allergen testing, along with all other surgical and non-surgical testing. She is healthy with no physical problems. So it has now become a Mommy problem to solve. Probiotics has now become my next venture. My go it’s have been pickles, sauerkraut, and yogurt. Those are things she likes. I want to expand her horizons with other fermented foods just concerned about adding gas to an already bloated girl.
Hi Laura, Sorry to hear about your daughter. I recommend to my clients to try raw apple cider vinegar or bitters (there are kid’s versions of these that are yummy) before eating meals. This helps bring the stomach acid to the correct pH, which then alleviates digestive problems all the way down the line. And ferments are always good, though start her on maybe just 2 Tablespoons and go up gradually. There is a solution so don’t give up! Glad you’re getting some good help.
Hi Laura. Did your child have colic when an infant? Mine did! Discovered later she had no way to ‘belch”: burp. she is now in her 40’s and there is NOW an actual medical name for this. I think they just ‘discovered’ this problem. Her pediatrician even laughed at me when I tried to tell him of her problems. Seemed to think it was funny. It certainly was NOT funny for my daughter nor me having to deal with her extreme discomfort.
There is only ONE doctor doing anything about it somewhere in the midwest, I think. I’ve just texted my daughter to give me the information again so I can post it here. This could be your childs problem. My daughter has had to learn to eat very small meals and NOT get too full. She also has some issues with gluten. Don’t give up on your child! continue searching and try to find others with the same issues. You may yet figure it out and find a solution.
Hi Carol-
My daughter, who is 16 now, has had these same issues since birth. Do you have the information from what you have learned and discovered with this to share?
Thank you!
I Have an email out to my daughter for all of her information on the subject…..I believe the only doctor doing the procedure is in Illinois…He recently “discovered” the medical issue and is doing a procedure which I believe involves injecting botox or something similar into the throat, relaxing the muscle responsible for burping. You might be able to do a search and find more about it. My daughter doesn’t always respond immediately ….When she does, I’ll post it here.
She finally got back to me:
https://laryngopedia.com/inability-to-burp/
RCPD
Any reason why I couldn’t add a couple tablespoons of whey from my homemade raw milk kefir along with the salt?
You can. It can give the milky taste of whey, which people love or hate.
Hi Heather,
I know this is about beets not cabbage, but since we’re in the ferment family, you’ve inspired me to get my sauerkraut routine going again.
Thanks,
Anna
So glad hear that! I love kraut. 🙂
What is the least amount of salt you could use? Salt is not in my diet plan!
It’s literally one quarter of one teaspoon per half cup serving. Use a good salt like himalayan pink salt. I was diagnosed with sodium sensitive high blood pressure by my doctor. I switched to pink salt, and stopped nitrates, prepackaged food, fast food and table salt, and I now have low blood pressure.
I have a Kwas recipe in an older Polish cookbook that doesn’t call for any salt and I’m trying to find out if this is correct because I want to use the recipe! I don’t want to mess it up though if salt is essential.
Why don’t you try with a small batch?
Can this be fermented in swing top bottles instead of airlock?
Your bottle will explode. The gasses need to escape.
You can buy air locks at any wine or beer making store. Also buy rubber stoppers/plugs of various sizes to fit into the top of the bottles you’ll use for fermenting. The items are very inexpensive, ie, about $1-2 each.
Well, last week your site helped me make the best laundry detergent ever (mmmm liquid soap nuts) and I’ll be trying this next week! I love the taste and health benefits of beets and ginger. I know this is going to be great too!
Can the ginger be substituted with something else? I’m sensitive to ginger. It makes me want to itch my eye balls out. Thank you ?
You can just leave it out 🙂
I’ve been researching recipes to make this and was wondering how using more salt would affect the process…speed it up or taste too salty? 3 teaspoons to 1 qt of water…in your opinion?
By the way your instructions are the most comprehensive I’ve seen!
Typically, more salt slows fermentation. And of course it does taste saltier, but whether it is too much is just a matter of taste. I just tasted some with the amount called for in the recipe, and I think you could probably get away with a little bit more if you wanted to.
Hi Heather,
After you strain the Kvass, have you ever saved the veg, adding to a salad or eating like Sauerkraut?
I make your Fire Cider recipe, love it! And I save the veg from that and eat a little everyday until I run out. Which isn’t often because I keep that year round.
Thank you in advance for your reply. 😀
Hi Elle, I have never eaten them but I don’t see why you couldn’t. 🙂
We eat them all the time. I’ve started roughly peeling my beets, then make two batches. One with just the peels, and one with the peeled beets. Then we eat the peeled beats along with drinking the kvass.
Do I leave this out of the fridge to ferment? If so a certain temp or darkness needed?
Can you add a little pickle juice from batch of lacto pickles I made previously for added probios kind of like a veggie starter culture?
I see that you’re using the airlock with a wide mouth jar. What is the lid into which you insert the airlock? Can I get a lid that allows me to use an airlock with a wide mouth mason jar?
Do you think using a ginger bug as the starter culture would work? I already have one on hand and would love to try this right away.
You can. What you will end up with will be boozy, because ginger bug is almost all yeast, and the beet sugar will just ferment and ferment away.
But it is soooo delicious. I actually keep a “beet bug” going and I absolutely love my “beet beer” with a cheese platter.
I added turmeric and mint to mine. Hopefully it tastes good. Do you leave it on the counter while it ferments?
This may be a dumb question, but if I omit the ginger, can I still use the lower salt ratio or does the ginger do something to allow less salt to work??
Thank you for this great, easy to make recipe. I will try it out.
Is there a way to just subscribe to you blog? I can’t find this option. I would prefer to do that than to subscribe to a newsletter. I would be more likely to read it.
I really like this recipe and the ease with which you explain…except…I would really like to have the clamp down lid jars you have pictured. I’ve looked at the many offerings on Amazon and Ebay, and your photos looked so simple. I want to ease myself into fermenting w/o buying much equipment so I can decide if this is something I want to continue. Are the jars you picture available somewhere? Thanks so much! I’m a “grammy” wishing I’d had these resources 50 years ago.
I have this wonderful book called Fermented Vegetables. It has a recipe for golden beets with lemon and ginger. But at the bottom of the instructions it says it would last 5 days in the fridge. How could that be? What are your thoughts? I am very sensitive to foods. I am also pregnant and wanted to start with one tablespoon a day, but I don’t want to waste it if it lasts on 5 days.
I would like to subscribe to your newsletter. Thanks!
Thankyou for this recipe! SO simple! 🙂
I live in the far North Canada and wondering about the temp too, if our home is cooler, we would just ferment longer, right?
I have been making sourcrout for a while now and didn’t know about too much salt slowing down fermenting. I usually ferment my sourcrout on the counter for 10 weeks, I read somewhere that it takes this long to do something to histamines, can’t remember. But I love my crout and it helps SO much with my gut 🙂
If I make my beet kvass with a regular canning jar and plastic lid, do I need more salt because I will need to leave the lid a little lose?
thanks again!
That’s an interesting note about the histamines! I have tried to do water kefir so many times, but my gut literally inflates almost immediately after drinking even the tiniest sip. I think because the histamines. Stinky old kimchi doesn’t bother me, though, and seems to calm my stomach down. I knew there was a reason I love long fermented foods…
The science of fermenting without an airlock is pretty tricky and although it’s possible that increasing the salt would help I can’t say for sure.
Why doesn’t mommypotamus reply to the good questions in the comment section?
I do my best to reply but there are about 700 active comment threads on this site and it’s difficult to keep up!
I agree. She has barely answered a thing. Moving on to a different site.
Hello, Thank you for posting all these beautiful recipes. I used to make tepache wich is a fermented pineapple drink. I used to make it in GA; but since I move to LA, it’s impossible to get anything fermented. There is no humidity here. My question is how to make fermented food in such climate.
Do you have any suggestion?
Thanks for your help.
If you are referring to the airlock evaporating too quick, simply drape a plastic bag over the whole fermenting jar/crock and it will help to hold in the moisture. The airlock is designed for one main thing and that is to allow pressure to escape from the fermenting process, so putting it into a bag will still allow that and at the same time prevent excess evaporation. You should check the airlock daily to ensure there is still enough water.
This recipe looks great, going to try making some today. One question though, is it fine to eat the beets as well? I would assume so, but I’m new to fermenting so I just want to make sure I do everything correctly.
Thanks!
This is my big question too. Almost all recipes say to discard and I don’t know why. I want to make Kwas for a soup, which is a traditional Polish thing. So I just figured I can use the beets from the kwas in the Barzsc but it doesn’t seem common! I don’t know why it would be different than a brined, fermented pickle except for the peel left on the beet.
I’d have to say this is one powerful drink! Beets support the methylation cycle which is responsible for: Genetic expression and repair of the DNA, Inflammation response, Detoxification of hormones, chemicals, and heavy metals, Production and recycling of the most important anti-oxidant in the body called glutathione, Neurotransmitter formation and breakdown to determine our brain chemistry, Energy production and mitochondrial health and Immune response to fight infections. Ginger is a great addition and supports our Master Genes to manage inflammation. Plus the fermentation supports our gut health! This is wonderful, will have to try this.
looks amazing…will be trying this. We’re a Gaps family now, so we’re missing the water kefir/bubbly brew we’ve enjoyed for years.
Elvire, could you share your tepache recipe? I used to have one but lost it. Thanks, Carolina
I am so excited to try this and my first thought was…could I add some frozen blackberries I picked from my yard? Some how the deep red of the beets called for the deep blue purple of the berries. What do you think?
The sugar in fruit can accelerate fermentation and possibly create alcohol as a byproduct, so I usually stick to citrus peels. However, it’s certainly possible 🙂
Could I used dried ginger powder for this recipe?
Hi Raquel, dried chopped ginger would be a good option but I think the powdered version would alter the texture of the kvass into something a bit “gritty” which I’d personally want to avoid. Maybe if you use just a little it could work, though.
I used dried ground ginger and just strained with a cheesecloth at the end. Texture is clear and flavor is delicious. Slightly spicy, tangy, and delicious. Thanks for the recipe!
Where do I get a bottle or just a lid that has a hole for the fermentation lock? Not exactly something I find at Walmart with the canning supplies. Thanks!
Just go to a store that sells beer and wine making equipment. They should have that, or alternatively cut a round hole in a lid for a canning jars. You’ll need a special hole cutter attachment for (electric) drill or ask a handyman friend to cut a few lids with holes for you.
Can I use the same beets for a 2nd batch?
The original authors of the recipe say Yes. I tried it and the second batch was not too good, so I won’t do it again. And the beets aren’t that good / tasty to eat in a salad or otherwise after they’ve been fermented.
Hi,
For the second batch, can you use some of the first as a starter?
Thanks, David
Yes 🙂
Hi, I was wondering what jar/airlock you use in the photos? It’s different than what you link to. Thanks!
I’ve had those jars for a LONG time and I don’t actually know where to buy any more, sorry!
Thank you for this refresher, Heather. I just finished a batch of kvass that I used beets, onions and cabbage in that I found a couple years ago on your sidet, and actually forgot about it for over two months…It still turned out delicious. I put it into swing top bottles and added some of my active ginger bug and a few pieces of cut up ginger and got a super fizzy, lovely bubbly drink after 3 more days of a second ferment on my counter. My favorite way in the past was to consume it in a lovely pink kefir smoothie with just a hint of cinnamon added to just milk kefir and beet kvass and whizzed up in the blender till it got frothy….so good, so healthy! Thank you for all you do…I refer to your site often when deciding what to do next with herbs and such!
I make a lot of ferments and we always enjoy drinking the juices. If you peel the beets and ginger you can then eat them. Such a shame to toss them. I do turnips with some beets and a small addition of carrots, the juice is so refreshing and nutritious. I also like kohlrabi with carrots and garlic and a generous sprinkle of turmeric. I’ve always used 1 tablespoon of salt to a liter of water
and I haven’t found it too salty but will try a bit less salt next time around. Thanks for the tip.
I noted that several others have asked the same question; I’d like to know, too:
WHERE did you get the fermentation lid for the clamp jar? Did you make it yourself?
Thanks for the response!
I made this 3 days ago and completely forgot the salt! Can I just add salt and wait another 3 days? I drank some as well. Oops!
As long as your beets aren’t moldy, just go ahead and add the salt. It should be fine.
It looks like (and seems wise) that you are making this in a gallon jar though your recipe is in a quart jar… is that correct?
There is no mention of weights, did you use a weight?
I have gallon pickle jars from a phase my son went through as a teen, is there any reason I couldn’t/shouldn’t use those, if I can find or make the right (airlock) lid?
Hi Susan, I usually double or triple the recipe I shared here depending on the batch size I want, but I recommend the smaller amount because that’s a lot of kvass to commit to. 😉 I don’t use a weight for this recipe but I do always use an airlock. If you can find one that will fit your gallon jars it should work!
Hi Heather. I don’t mean to sound dim but what would you eat this with and in what quantity please? Thank you 😊
Love it all! Thank you 👍
Can I make this in a gallon jar, adjusting the amounts accordingly? Would I need to increase fermentation time for a larger amount?
Hi,
I know this a very old post, but I am interested in trying to make this kvass and I have a question regarding making a second batch as you mentioned in the post. To make the second ferment, do I use the old beets and then also 1/4 cup of kvass liquid? And then after that second ferment, then discard the beets??? Thank you for any info/clarification you can provide!
That is correct. With that said, if the beets have already been fermented for a longer period of time (more than a few days) they may not contain enough sugar to properly nourish the second ferment. In that case I would use fresh beets.
One of the best and easiest recipe. I have been making beet kvaas for many years using this recipe and never failed. Thank you so much.